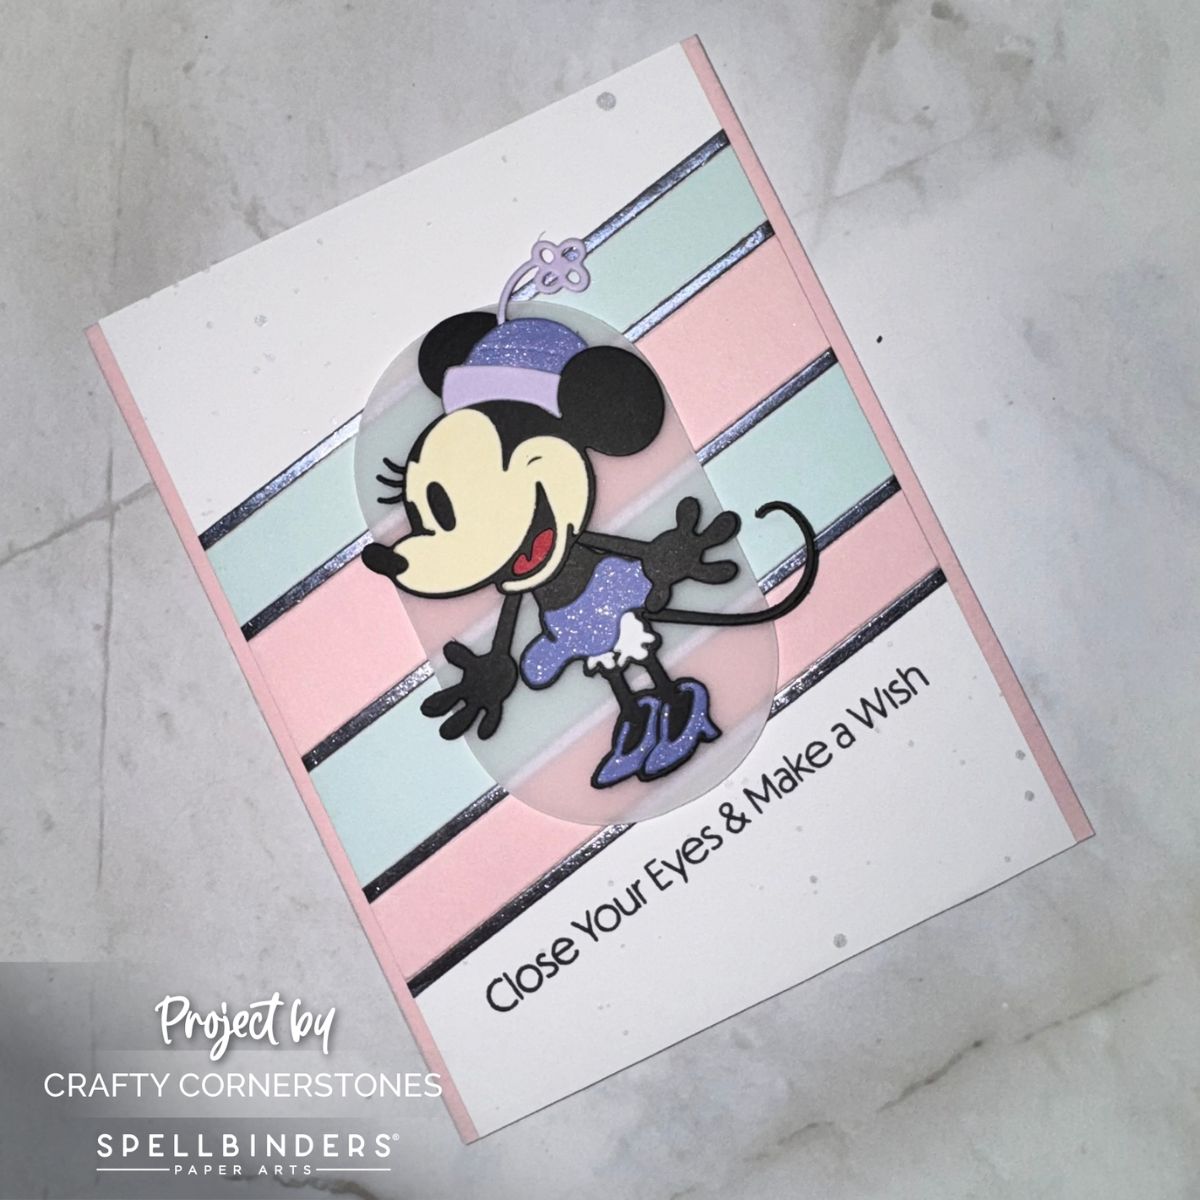
Celebrate Spellbinders’ 23rd Birthday with this playful pastel card featuring the Steamboat Willie Duo, sparkly accents, and a colorful striped background.
Today’s post is extra special because I’m helping celebrate Spellbinders’ 23rd Birthday! If you arrived here as part of the Spellbinders 23rd Birthday Party Blog Hop, welcome! We’re celebrating 23 years of creativity, inspiration, and amazing products with a fun-filled hop featuring lots of birthday-themed projects and plenty of inspiration along the way.

Giveaway Details
No birthday celebration would be complete without presents!
To celebrate this exciting milestone, Spellbinders is giving away three $25 gift certificates to lucky blog readers selected from comments left throughout the hop. Be sure to leave comments as you visit the blogs for your chance to win.
Giveaway Details:
- Three winners will each receive a $25 Spellbinders gift certificate.
- Giveaway closes on Sunday, June 28th at 11:59 PM MST.
- Winners will be announced in the Spellbinders blog hop post the following Wednesday.
- Winners are responsible for any shipping costs, duties, and taxes.
Now let’s get to the project!
A Sweet Birthday Card Featuring Steamboat Willie Duo
For my birthday celebration project, I created a sweet and cheerful birthday card featuring the Steamboat Willie Duo Die Set. I wanted something playful and colorful that would really capture the festive spirit of a birthday celebration.

Creating Mrs. Mouse
I began by die cutting all of the pieces needed to create Mrs. Mouse using scraps from my Spellbinders ColorWheel Cardstock collection. This is a fantastic way to use up those smaller pieces of cardstock while creating something fun.
To add a little extra birthday sparkle, I decided to give her shoes, hat, and skirt a subtle shimmer. Before assembling the pieces, I applied a clear sparkle overlay pen to the darker purple cardstock elements. The shimmer is delicate but catches the light beautifully and adds just the right amount of birthday magic.
If you are assembling the character for the first time, the assembly guide is incredibly helpful and can be found on the Spellbinders website.
Once all the pieces were prepared, I assembled Mrs. Mouse and set her aside while I worked on the rest of the card.
Building a Colorful Background
With my focal image complete, I turned my attention to the background.
Using the Strip Right Etched Dies, I cut strips from three coordinating cardstock colors. One thing I discovered while creating this card is that the small cardstock pieces left between the die cuts worked perfectly as additional strips for my design. While they may not have been the intended use, they fit beautifully into the pattern and helped maximize every bit of cardstock.
To make arranging the strips easier, I laid them out in the order I wanted and added a piece of tape to the back. This simple trick allowed me to treat all of the strips as one unit, making it much easier to shift and position them until I found the perfect placement before adhering them permanently.
And don’t throw away any leftover strips! They can be incorporated into this project or saved for future projects.
Adding Some Birthday Sparkle
With the background strips ready, it was time to work on the card base.
I started with a piece of white cardstock cut to 4¼” x 5½” and splattered it with Silver Winsor & Newton Drawing Ink. The silver splatter adds a festive touch without overwhelming the design and creates a fun celebratory backdrop.
I set the panel aside to dry while moving on to the card base.
Creating the Card Base
For the base, I cut a piece of heavyweight white cardstock to 8½” x 5 1⁄2″ and scored it at 4¼” to create a standard side folding A2 card.
Next, I took some of the leftover blush-colored strips from earlier and adhered them along both long edges of the card front.
Tip: Make sure your blush strips are at least ¼” wide and 5½” long. This gives you enough coverage while allowing for trimming later.
After adhering the strips, I trimmed any excess cardstock for perfectly aligned edges. Just be careful not to cut into the folded score line while trimming.
Assembling the Background
Once the silver-splattered panel was completely dry, I adhered my taped strip arrangement diagonally across the center of the panel.
After securing the strips, I trimmed approximately ⅛” from each long side of the panel and removed any strip overhang. This helped create a cleaner finished look and allowed the blush border strips on the card base to peek through.
The completed panel was then adhered to the card base, leaving approximately ⅛” of the blush cardstock visible along each side.
Grounding the Focal Image
With the background complete, I began experimenting with placement for Mrs. Mouse and my sentiment.
As I moved the assembled image around the card front, I realized that the colorful strips were competing a little with the focal image. To soften the background and help Mrs. Mouse stand out, I cut a vellum oval using the Essential Stylish Ovals set.
The vellum created the perfect visual resting place while still allowing the colorful background to show through.
I added foam tape to the back of Mrs. Mouse and adhered her to the center of the vellum oval. The added dimension helps draw attention to the focal image and creates additional interest.
Adding the Sentiment
Before adhering the vellum oval permanently, I placed it temporarily on the card front to determine the best location for the sentiment.
Once I was happy with the placement, I carefully removed the focal image and stamped my sentiment directly onto the card panel.
After the sentiment was stamped, I added adhesive to the back of the vellum oval, placing the adhesive only behind the mouse so it would remain hidden. Then I adhered the completed focal image to the card front.
Finished Card Thoughts
This card was such a fun project to create! I especially enjoyed using cardstock scraps to build Mrs. Mouse and finding creative ways to use every piece from the Strip Right die cuts.
While I chose a softer, more feminine color palette for this version, the same layout could easily be adapted for a masculine birthday card. Simply swap the colors and create Mr. Mouse instead for an entirely different look while using the same die sets and design concept.
Continue the Birthday Celebration!
Looking for even more birthday inspiration? Be sure to continue along the blog hop and visit the next stop. There are so many creative projects to enjoy, and don’t forget to leave comments along the way for your chance to win one of the Spellbinders gift certificates.
You can also browse through some of the birthday-themed projects here on my blog for even more celebration inspiration.
- Classic Road Legends
- Summer Camp
- Born for the Good Times
- Leaf and Bloom Birthday Wishes
- Magical Fuchsia
- Bright and Fun Birthday
- House Mouse Party Parade
- OMG Missed your Birthday
Complete Blog Hop

Here is the complete blog hop lineup:
Spellbinders BlogYana Smakula
Tina Smith
Nichol Spohr
Mindy Eggen
Cheryl Penner
Allison Frazier
Sandi MacIver
Amy Rysavy
Michelle Short
Heejung Hunsberger
Sheri Gilson
Rebecca Keppel
Karen Brown
Nancy Leppek
Tanya Boser
Kristie Marcotte
Michelle Woerner
Debbie Frank
Kathy Solie
Lea Lawson
Teresa Rogers – YOU ARE HERE
Jennifer Kotas – Your Next Stop
Thank you so much for stopping by and helping us celebrate 23 wonderful years of Spellbinders creativity! Happy hopping, and good luck in the giveaway!
Your support, encouragement, and creativity mean more than you know. I am so grateful you take the time to visit and create along with me. When you shop using my affiliate links, at no additional cost to you, it truly helps me continue to bring more crafty inspiration, tutorials, and project ideas to the blog. Thank you for supporting Crafty Cornerstones and this creative journey.
Supplies
- Steamboat Willie Duo Die Set
- Strip Right Etched Dies
- Essential Stylish Ovals Etched Dies
- Birthday Unboxing Sentiments
- ColorWheel Cardstock
- Vellum
- Silver Winsor & Newton Drawing Ink
- Clear Sparkle Overlay Pen
- Black Ink Pad
- Bearly Arts Liquid Adhesive
- Foam Squares
- Platinum 6 Die Cutting and Embossing Machine
- Paper Trimmer
- Scoring Board
- Stamp positioning tool
- Paint Brush (for splattering)




Leave a Reply