A One Layer Card Featuring the Simon Hurley Happy Spring Collection by Spellbinders
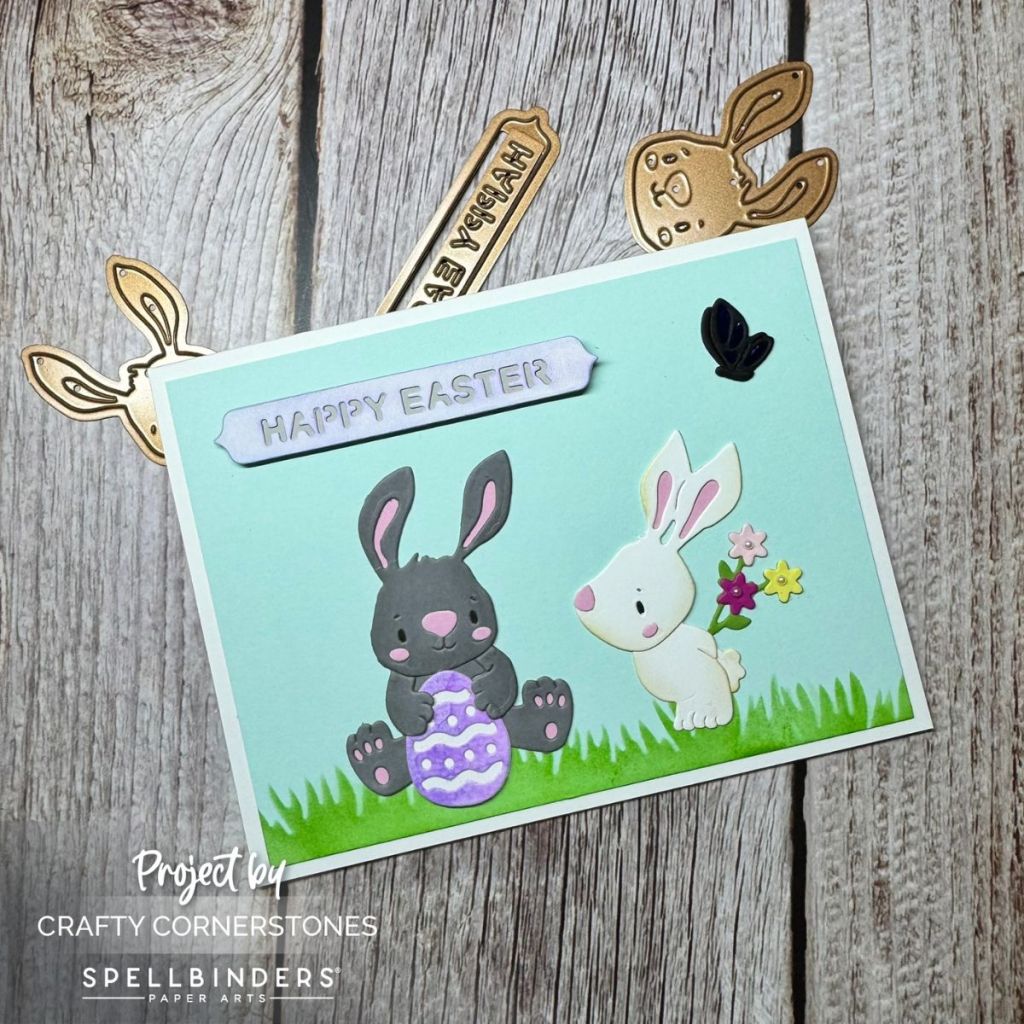
Today I am sharing a sweet and simple Easter card featuring the bunny buddies etched die set from the Spellbinders Simon Hurley Happy Spring Collection. I completely fell in love with this collection. These sweet bunnies are just adorable and full of personality.
Since I will be mailing most of my cards this Easter, I decided to focus on a one layer design that would travel well through the mail while still feeling special and dimensional.
Let the Bunnies Shine
The star of the show for this card is, of course, the bunnies. I chose two to work with from the bunny buddies die set.
- One bunny was cut from Anchor Cardstock
- The second bunny was cut from Classic White
- Layering pieces were cut from Tutu and Raven cardstocks
For the flowers, I used Rainforest, Blush, Wild Berry, and Beeswax. I added small flat back pearls to the flower centers for a soft finishing touch.
The egg was created using Classic White for the base and a scrap piece of purple left over from a previous water coloring project. I love when I can use up those little bits of leftover cardstock.
For the butterfly, I used Raven along with a scrap of dark blue mirror cardstock to give it just a bit of shine.
Adding Soft Dimension and Detail
Before assembling, I added some subtle depth to the die cuts.
Using a dark grey ink blending brush, I gently added shading to the bunny cut from Anchor. For the bunny cut from Classic White, I used Sandy Beach Ink from Gina K. to warm it up just slightly.
Once the shading was complete, I assembled the bunnies, butterfly, egg, and flowers.
A quick tip:
Be sure not to fully glue down the bunny hands on the sitting bunny if you want the option to tuck in the basket or egg. That little bit of flexibility adds so much charm and dimension to the design.
Creating a Soft Spring Background
Since I wanted a blue sky but also wanted my bunnies sitting on grass, I chose Seaside cardstock. It is light enough to blend over without muddying the grass color.
I cut the panel to 5.5 x 4.25 inches.
For the grass, I used the Clouds and Grass Stencil from Hero Arts and blended Lucky Clover ink from Gina K. over the bottom portion.
After blending, I trimmed the panel down slightly to 5.25 x 4 inches to remove any darker edges from the ink blending. This keeps everything looking clean and polished.
The finished panel was adhered to a white A2 card base.
Finishing with a Coordinated Sentiment
For the sentiment, I decided to play off the purple in the egg.
I cut the top layer from Classic White using the Happy Easter Sentiment and lightly blended purple ink over it. For the shadow layer, I used a light grey scrap of cardstock.
The layers were adhered together, foam tape was added to the back for just a touch of dimension, and then it was placed onto the card.
Quick, Easy, and Full of Personality
This card came together quickly, but it is full of charm. The playfulness of the bunnies really shines through, and I love that it remains fairly flat for mailing while still feeling layered and detailed.
What are you creating for Easter this year? Are you keeping your cards more mail-friendly, or are you going all out with layers and embellishments?
Thank you so much for stopping by Crafty Cornerstones. Your support, encouragement, and creativity mean more than you know. I am so grateful you take the time to visit and create along with me. When you shop using my affiliate links at no additional cost to you, it truly helps me continue to bring you more crafty inspiration. I appreciate you more than you know.
Supply List
- bunny buddies etched die set – Simon Hurley Happy Spring Collection by Spellbinders
- Anchor Cardstock
- Classic White Cardstock
- Tutu Cardstock
- Raven Cardstock
- Rainforest Cardstock
- Blush Cardstock
- Wild Berry Cardstock
- Beeswax Cardstock
- Seaside Cardstock
- Sandy Beach Ink – Gina K.
- Lucky Clover Ink – Gina K.
- Clouds and Grass Stencil – Hero Arts
- Dark blue mirror cardstock (scrap)
- Purple cardstock (scrap)
- Flat back pearls
- Foam tape
- Platinum 6 Die Cutting Machine
- Bearly Arts liquid Adhesive
Happy Spring Collection Posts:
- Debossed Easter Bunny Card with the Simon Hurley Happy Spring Collection
- Elegant Paper Pieced Easter Card with the in bloom egg
- Layered ornate eggs Easter Card – Ink Blended Background with Spellbinders Simon Hurley Happy Spring Collection


Leave a comment