A Shaped Card Featuring the Spellbinders Simon Hurley Happy Spring Collection
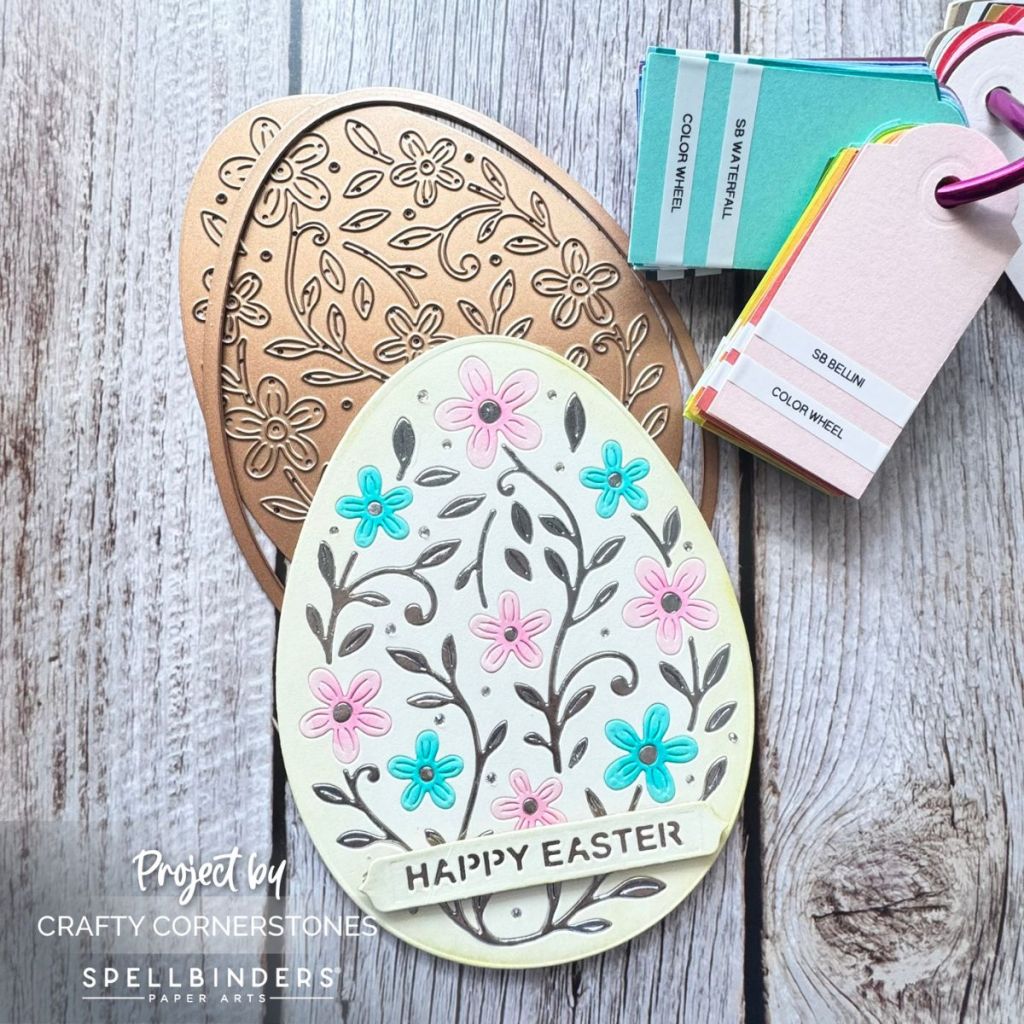
Today’s project was all about paper piecing, and I have to say — the in bloom egg from the Spellbinders Simon Hurley Happy Spring Collection is truly a thing of beauty. The delicate layered pieces make for a stunning and elegant card that looks intricate but comes together surprisingly quickly.
If you love detailed die cutting and the relaxing process of inlaying pieces, this design is such a joy to create.
Creating a Shaped Egg Card Base
I decided right away that I wanted this to be a shaped card.
To create the base, I used the large solid egg die and cut it from an A2 top-folding card base. The key here is to let the very top of the egg hang slightly over the fold so it creates a hinge. This allows the card to open and close properly while keeping the egg shape intact. Don’t worry — the top layer will cover that extended hinge area beautifully.
This simple step instantly elevates the finished card.
Die Cutting & Preparing for Paper Piecing
For the decorative top layer, I used both egg dies together and cut the detailed egg from Alabaster cardstock.
Before removing the die-cut from the die, I placed a piece of Press’n Seal over the back to hold all of the pieces together. This is one of my favorite paper piecing tricks because:
- It keeps all the tiny pieces in place
- It helps you remember exactly where everything belongs
- It makes the inlay process so much faster
Even though my main egg layer was Alabaster, I also cut the decorative egg from Brushed Silver, Waterfall, and Bellini cardstock using the same method. I didn’t use every single piece from those colors — just selected elements — and I set the extras aside for future coordinating projects.
Nothing goes to waste in the craft room.
Adding Soft Dimension with Ink Blending
After preparing my pieces, I gently peeled the Alabaster egg off the Press’n Seal, leaving only the floral pieces behind.
To give the egg a bit of soft dimension, I lightly ink blended around the edges using Skeleton Leaves ink from Gina K Designs. This subtle shading adds depth without overwhelming the clean elegance of the design.
Once blended, I adhered the egg layer to the shaped card base.
Inlaying the Silver Leaves & Vines
I began the inlay process with the Brushed Silver pieces. Carefully removing each piece from the Press’n Seal, I adhered them into place with small amounts of liquid adhesive.
The silver leaves and vines add a beautiful elegance to the design. I also used the silver for the floral centers once the flowers were placed.
Bringing the Flowers to Life
Before inlaying the floral pieces, I lightly ink blended the centers of each flower to add dimension.
- Waterfall flowers – Gina K Turquoise Sea ink
- Bellini flowers – Gina K Medium Carnation ink
This small step gives the flowers just enough shading to make them feel soft and dimensional while still keeping the card flat enough for mailing.
Once blended, I adhered each piece into its coordinating opening.
Adding a Touch of Sparkle
For the tiny decorative dots around the egg, I decided I wanted a little extra sparkle.
Instead of inlaying the small die-cut dots, I added small flat-back diamond gems from my stash. If you’re looking for a coordinating option, the Spellbinders Color Essentials Gems would be a perfect substitute to match your cardstock choices.
It adds just the right amount of shimmer without overpowering the design.
Finishing with a Soft, Elegant Sentiment
Because the egg design is the true focal point, I wanted to keep the sentiment simple and cohesive.
I die-cut “Happy Easter” from Alabaster cardstock and lightly ink blended it the same way I did the egg for a cohesive look. The shadow layer was cut from Brushed Silver to tie everything together.
I slightly popped the sentiment up with foam tape for subtle dimension, and just like that — the card was complete.
I absolutely love how elegant this card feels while still being flat enough to mail without extra postage. That’s always a win in my book.
I have so many more ideas in mind for this beautiful set. What would you create with the in bloom egg? Tell me in the comments below — I would love to hear your ideas.
Thank you so much for stopping by Crafty Cornerstones today. I’m so grateful you’re here and sharing this creative journey with me. Please consider using my affiliate links as it will help me continue to bring you more crafty ideas.
Supply List
- Spellbinders Simon Hurley Happy Spring Collection – in bloom egg
- Alabaster Cardstock
- Brushed Silver Cardstock
- Waterfall Cardstock
- Bellini Cardstock
- Gina K Designs Skeleton Leaves Ink
- Gina K Designs Turquoise Sea Ink
- Gina K Designs Medium Carnation Ink
- Press’n Seal
- Bearly Arts Liquid Adhesive
- Foam Tape
- Flat Back Diamond Gems or Spellbinders Color Essentials Gems
- Platinum 6 Machine
- Mini Ink Blending Brush
- Ink Blending Brush
Additional Happy Spring Collection Posts:
- Debossed Easter Bunny Card with the Simon Hurley Happy Spring Collection
- Layered ornate eggs Easter Card – Ink Blended Background with Spellbinders Simon Hurley Happy Spring Collection
- Sweet Easter Wishes with bunny buddies


Leave a comment