A Bright and Cheerful Take on the May 2026 Stitching Die of the Month by Spellbinders
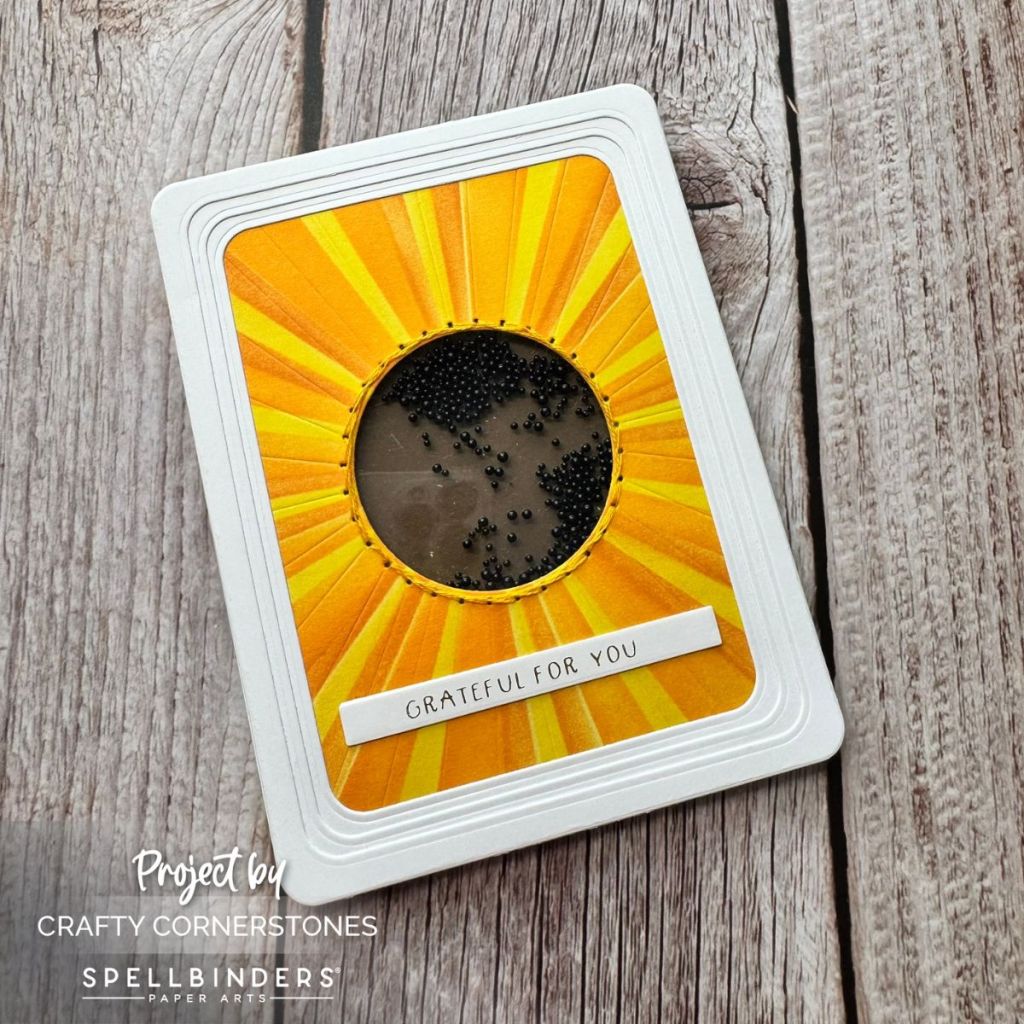
Today’s project features the May 2026 Stitching Die of the Month from Spellbinders with a fun and unexpected twist! Instead of creating the smiling sun design the die was intended for, I transformed it into a bright sunflower shaker card filled with tiny black beads to resemble sunflower seeds.

This project combines stitching, stenciling, hot foiling, and shaker elements all into one cheerful “Grateful For You” card that feels perfect for sending encouragement, appreciation, or just a little sunshine to someone special.
Main Panel
To begin the project, I started with a piece of white cardstock approximately 6” x 6”. The exact size does not matter as long as it is larger than 3 ¾” x 5” since it will eventually be trimmed down and hidden behind the frame.
Using the March 2026 Stencil of the Month “Burst Mode,” I blended layers of yellow and orange ink to create a glowing background effect. I used inks from Gina K Designs including:
Any similar yellow and orange ink combinations would work beautifully for this technique.
Once the stenciling was complete, I used the main die piece from the stitching die set to cut the sunflower opening, carefully centering the design so the petals radiated outward from the flower center.
After die cutting, I trimmed the panel down to 3 ¾” x 5” and rounded the corners so they would coordinate with the finished frame.
Stitching the Sunflower
With the background complete, it was time to add stitching detail to the sunflower center.
For the stitching, I used DMC 972 six-strand embroidery floss in Deep Canary Yellow. I prefer separating the floss and stitching with only two strands because it creates a cleaner stitched look and is easier to work with, though using more strands will create a bolder stitched texture.
I secured the thread to the back of the panel using liquid glue, though tape works well too. Then I stitched around the flower center using a split stitch pattern.
Once the stitching was complete, I secured the thread on the back of the panel and trimmed away the excess floss.
The stitched detail adds wonderful texture and really helps draw attention to the sunflower center.
Creating the Tunnel Frame
To create dimension around the sunflower, I used three sizes from the Rounded Rectangle Infinity Die Set by Hero Arts.
To build the layered frame effect, I used the same largest rectangle die for all three layers while changing only the inner rectangle size. This helped keep the outside edges perfectly aligned while gradually widening the opening toward the top.
After die cutting the layers, I stacked them together using liquid glue:
- Smallest opening on the bottom
- Medium opening in the middle
- Largest opening on the top
This created the dimensional tunnel frame effect around the sunflower that gives the card so much depth and interest.
Creating the Shaker Element
Now it was time to create the sunflower shaker center.
I cut two pieces of acetate slightly larger than the flower opening. The first piece was secured directly behind the sunflower opening using double-sided tape.
Next, I added 2 mm foam tape around the window opening directly onto the acetate. Make sure the foam tape touches on all sides with no gaps so the beads cannot escape.
Once the foam tape was in place, I filled the center with black mini beads to mimic sunflower seeds. After adding the beads, I removed the foam tape backing and sealed the shaker with the second acetate piece.
To keep the card level and sturdy, I added additional foam tape across the remaining back portion of the panel.
The Sentiment
For the sentiment, I used the “Grateful For You” greeting from the April 2026 Press and Foil of the Month “Seed Co. Border.”
The sentiment was hot foiled using Gold Hot Foil with the Glimmer Foiling System from Spellbinders and then die cut with the coordinating die.
The gold foiling adds the perfect elegant finishing touch to the warm sunflower tones.
Final Assembly
To assemble the card, I started with an A2 card base and rounded the corners to coordinate with the frame design. I also rounded the corners of a piece of Truffle cardstock that would sit behind the shaker opening.
The brown cardstock was adhered directly to the card base so it would show through the sunflower center and enhance the sunflower seed effect.
Next, I attached the layered tunnel frame to the front of the sunflower shaker panel.
Finally, I removed the backing from the foam tape and adhered the completed shaker panel to the card base before adding the foiled sentiment.
And just like that, the card was complete!
Supplies Used
Dies & Stencils
- Spellbinders May 2026 Stitching Die of the Month
- Spellbinders March 2026 Stencil of the Month – Burst Mode
- Hero Arts Rounded Rectangle Infinity Dies
- Spellbinders April 2026 Press and Foil of the Month “Seed Co. Border
Inks
Other Supplies
- DMC 972 Embroidery Floss
- Black Mini Beads
- Gold Hot Foil
- Acetate Sheets
- 2 mm Foam Tape
- Liquid Glue
- Double-Sided Tape
- Truffle Cardstock
- White Cardstock
- Glimmer Foiling System
- Platinum 6 Die Cutting and Embossing Machine
- Corner Rounder
Reader Question
Have you ever used a product in a completely different way than it was originally intended? I would love to hear how you would reinvent this stitching die design!
Thank You
Thank you so much for stopping by today and spending a little crafty time with me. Your support means so much to me and helps keep Crafty Cornerstones going. When you shop using my affiliate links, I may earn a small commission at no additional cost to you. Thank you for supporting both my creativity and this community!
If you create your own version of this project, be sure to tag me @CraftyCornerstones on social media. I absolutely love seeing your creations!


Leave a comment