Spellbinders Advent Calendar 2025 Day 18: A Fun Birthday Card with the Wavy Corners Die
Spellbinders Day 18 Surprise: Wavy Corners Die
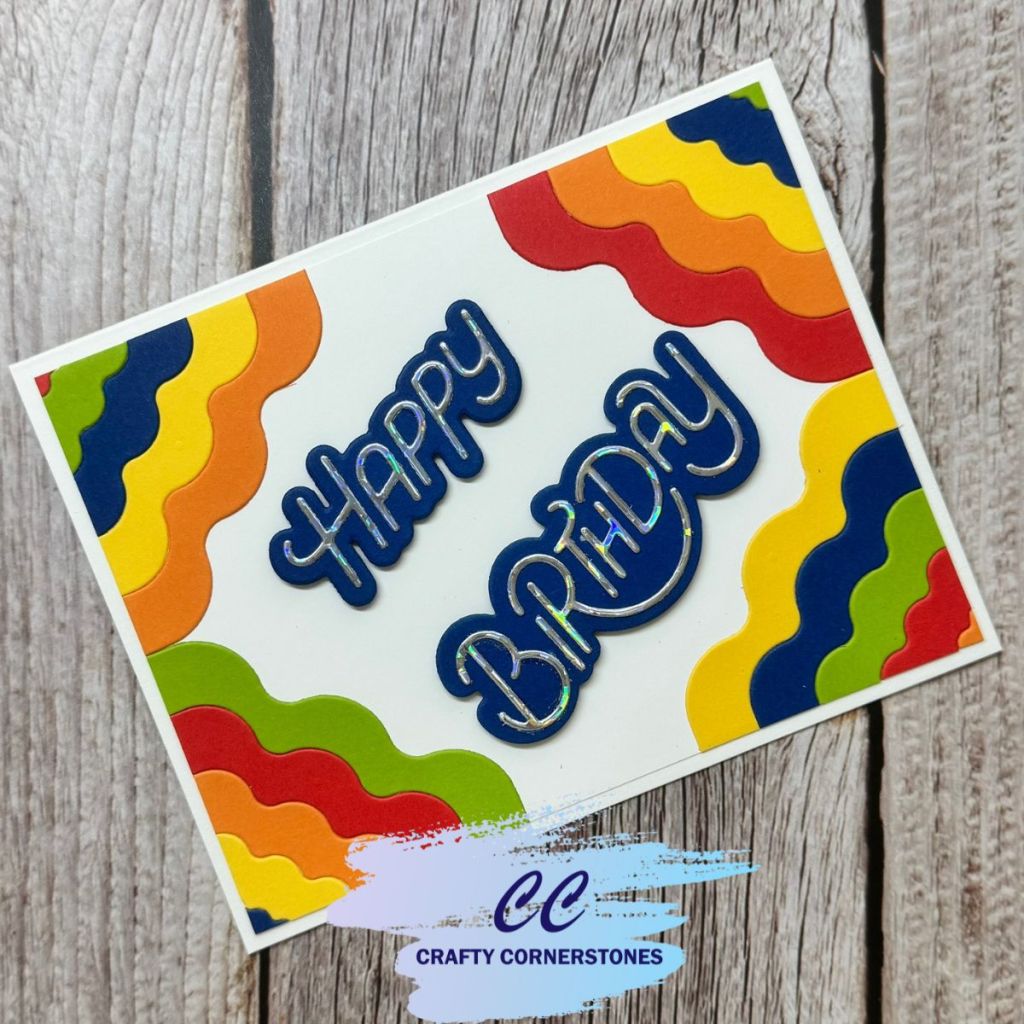
Day 18 of the Spellbinders Advent Calendar revealed a playful and versatile Wavy Corners Die set. As soon as I saw it, I knew it would be perfect for creating a quick birthday card that still packs in plenty of color and visual interest.
This die is ideal for using up cardstock scraps, experimenting with color combinations, and creating cards that feel special without requiring a lot of time or layers.
Creating the Colorful Wavy Corners
To bring this card to life, I started by cutting the wavy corners from five different colors of Spellbinders ColorWheel Cardstock. I chose Beeswax, Poppy, Rainforest, Cosmic Sky, and Carrot for a bold and cheerful palette that works beautifully for birthdays.
After cutting the pieces, I separated them and rearranged the colors in varying orders to create a five-color wave effect. I used four sets of the wavy corners for this card and saved the fifth set for a future project.
To make assembly easier later, I added tape to the back of each assembled wave. This allowed me to keep the pieces together and made positioning them on the cardstock much simpler.
Die Cutting and Assembling the Sentiment
For the sentiment, I used the Spellbinders Stylized Happy Birthday die set. I cut the shadow layer from Cosmic Sky cardstock and the letter layer from silver foil cardstock for a bit of shine and contrast.
When adhering the letters to the shadow, I used the negative die cut as a placement guide. By carefully inlaying each letter and avoiding excess glue, I was able to remove the negative die cut cleanly once everything was in place. This method creates perfectly aligned letters every time and keeps the sentiment looking crisp and professional.
Card Assembly and Final Details
Once all the elements were ready, I cut a white cardstock panel to 4.25 x 5.5 inches. I adhered one wavy corner piece to each corner of the panel, making sure everything was secure.
After the corners were in place, I trimmed the panel down to 4 x 5.25 inches. This step ensures that all the edges are perfectly aligned and gives the card a polished finish.
To add dimension, I placed foam tape on the back of the Happy Birthday sentiment and adhered it to the center of the card. Finally, I attached the entire panel to an A2 card base.
This card came together quickly and easily, yet the bright colors and layered die cuts make it feel fun and special—perfect for a birthday celebration.
Let’s Chat
Do you enjoy using bold color combinations on birthday cards, or do you tend to stick with a more neutral palette?
Supply List
- Spellbinders Wavy Corners Die (Day 18 Advent Calendar) (Sold Out)
- Spellbinders Stylized Happy Birthday Die Set (Birthday Celebrations Bundle)
- Spellbinders ColorWheel Cardstock: Beeswax, Poppy, Rainforest, Cosmic Sky, Carrot
- White Cardstock
- Silver Foil Cardstock (Silver Assortment Treasured Cardstock)
- Die Cutting Machine
- Adhesive and Foam Tape
- Paper Trimmer
Thank you so much for stopping by Crafty Cornerstones. Be sure to subscribe so you don’t miss future projects. Using my affiliate links is never an extra cost to you and helps me continue sharing crafty inspiration. I’d also love to hear from you—leave a comment below and let me know what you’re creating.
Missed a 2025 Advent Project? Links Below
Spellbinders 2025 Advent
- Spellbinders Advent Day 1
- Spellbinders Advent Day 2
- Spellbinders Advent Day 3
- Spellbinders Advent Day 4
- Spellbinders Advent Day 5
- Spellbinders Advent Day 6
- Spellbinders Advent Day 7
- Spellbinders Advent Day 8
- Spellbinders Advent Day 9
- Spellbinders Advent Day 10
- Spellbinders Advent Day 11
- Spellbinders Advent Day 12
- Spellbinders Advent Day 13
- Spellbinders Advent Day 14
- Spellbinders Advent Day 15
- Spellbinders Advent Day 16
- Spellbinders Advent Day 17
Pink and Main 2025 Advent
- Pink and Main Day 1
- Pink and Main Day 2
- Pink and Main Day 4
- Pink and Main Day 5
- Pink and Main Day 6
- Pink and Main Day 7
- Pink and Main Day 8
- Pink and Main Day 9
- Pink and Main Day 10
- Pink and Main Day 11
- Pink and Main Day 12
- Pink and Main Day 13
- Pink and Main Day 14
- Pink and Main Day 15
- Pink and Main Day 16
- Pink and Main Day 17


Leave a comment