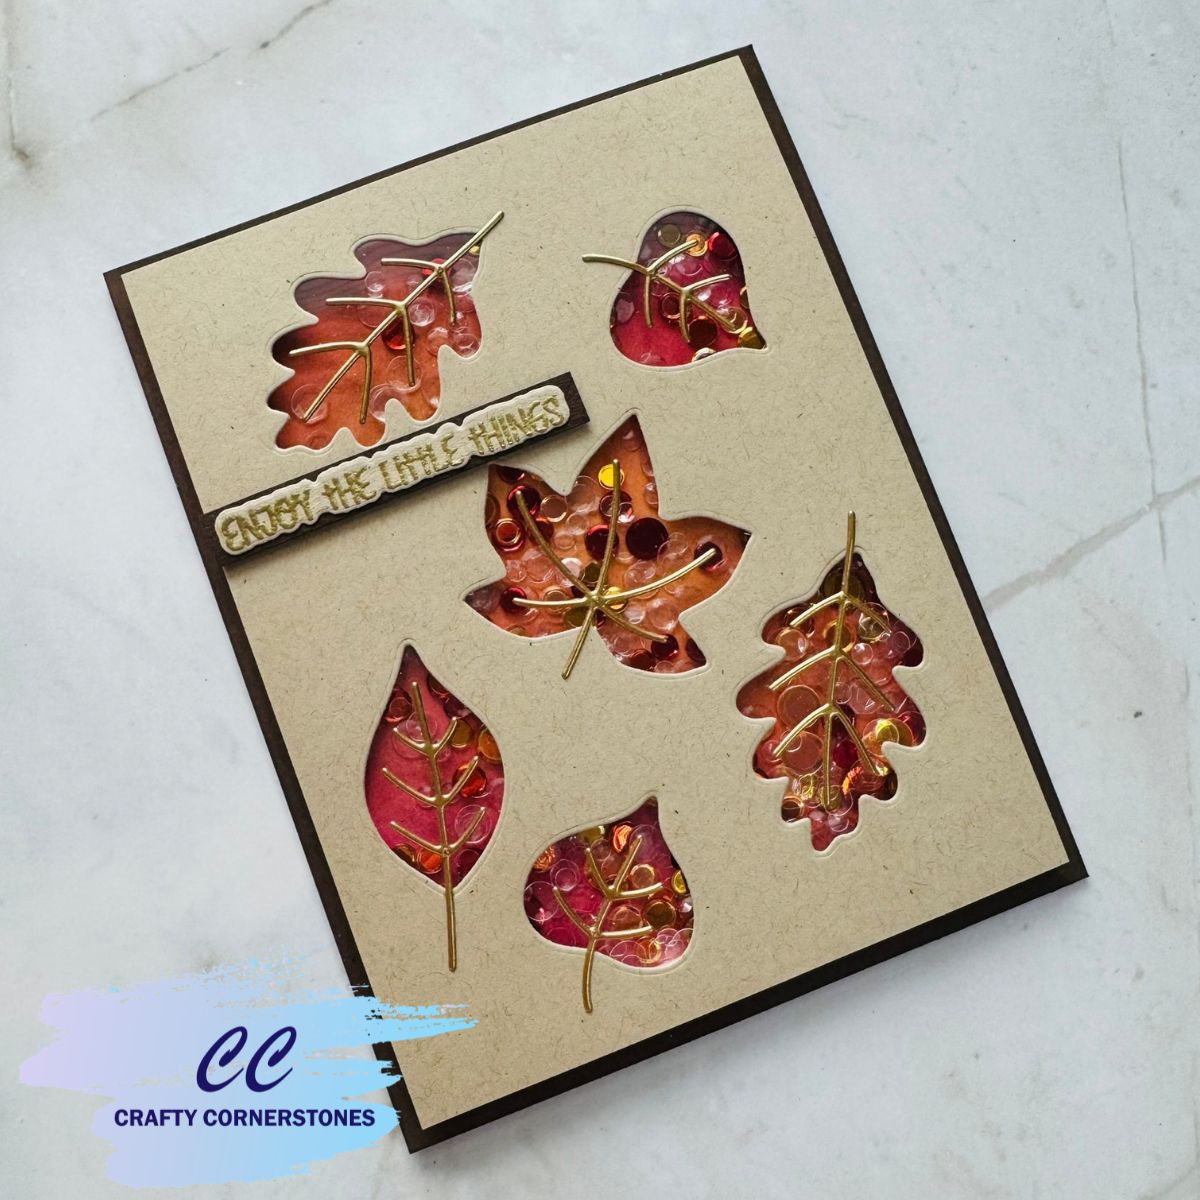
Two Fall-Themed Cards Featuring Repetitive Stamping & Negative-Space Shaker Techniques
We are rolling straight into my favorite season of the year. The nights are cooler, the sunshine feels warm and gentle, and the air has that crisp little snap that can only mean one thing—Fall is officially here. Today’s projects fit that seasonal shift perfectly, and I’m excited to share two cards created with the new Hero Arts Cozy Season Collection.
These designs highlight two techniques I love: repetitive stamping and negative‑space die‑cut shaker building. Both are simple, approachable, and perfect for fall crafting sessions.
Card One: Repetitive Stamping for a Cozy Fall Background

For the first card, I kept things simple and leaned into a repetitive stamping technique that creates a warm, balanced background.
I began with a kraft cardstock panel measuring 4.25″ x 5.5″. I placed it in my stamp positioning tool, leaving room on all sides so I could stamp over the edges without worrying about placement. Using the stamps from the Hero Arts Hide and Peek Stamp & Cut Set, I arranged my images on one side of the panel—making sure not to cross the halfway point. This ensures that when the panel is flipped, the images won’t overlap.
Once the first set of images was stamped, I flipped the panel, so the top became the bottom and stamped again. I repeated this several times, switching out stamps to fill empty spaces while always keeping them below the halfway line.
TIP: If you plan to reuse the same images, make sure your stamps are thoroughly cleaned between impressions. This prevents any accidental ink transfer when you’re deciding on placement for the next round of stamping.
With the stamping complete, I trimmed each edge by 1/8″. Trimming all sides evenly keeps the pattern symmetrical and removes any ink pooling from stamping off the edges.
For the sentiment, I used the Hide and Peek set again—this time heat embossing with Brutus Monroe Penny Embossing Powder to help it stand out against the busy background.
Originally, I planned to mount the panel on black cardstock, but the stamping felt a little lost. Instead, I swiped embossing ink along all four edges of the black panel, added the same Penny embossing powder, and heat set it. This pulled the entire color palette together beautifully.
To finish the card, I adhered the stamped panel to the embossed base. I wanted the sentiment to have more dimension, so I die‑cut three additional layers from black cardstock, stacked them, and adhered the sentiment to the center of the card.
Card Two: Negative-Space Shaker Using Lovely Little Leaves
For the second card, I used the Hero Arts Lovely Little Leaves Die Set along with the Hide and Peek Stamps and Dies for the sentiment.

I started with a panel trimmed to 4″ x 5.25″. After arranging the leaf dies carefully—leaving enough room around the edges to hide foam adhesive later—I die‑cut the leaves. I repeated the process a second time to fill in empty spaces.
Next, I cut the delicate leaf veins from Spellbinders Mirror Gold Cardstock. Because the veins are thin and I was adhering them to acetate, I added double‑sided adhesive to the back of the cardstock before die‑cutting. This turned the veins into stickers, making placement much easier and preventing glue seepage.
With the leaf openings cut and the veins ready, I trimmed a piece of acetate slightly smaller than the leaf panel. On the backside of the panel, I added double‑sided tape and adhered the acetate. Using my bone folder, I pressed firmly to ensure a strong bond. Then I added the gold leaf veins to the front of the cardstock and acetate.
To create the colorful background that shows through the leaf openings, I ink‑blended white cardstock using Hero Arts Pumpkin, Fawn, and Cranberry inks. Checking the placement several times to ensure no white areas peeked through when the leaf panel was laid on top.
To build the shaker pocket, I added thick foam tape around the backside edges of the leaf panel—making sure not to cross into the leaf openings but ensuring the tape touched on all sides so the shaker filling wouldn’t spill out. I added my shaker mix, then enclosed everything with the ink‑blended panel (ink side facing the leaf panel). This created a shaker pocket that was easy to adhere to my background.
The shaker pocket was mounted onto a 4.25″ x 5.5″ piece of truffle cardstock, then adhered to an A2 side‑folding card base. I chose side‑folding because the weight of the shaker pieces pulled a top‑folding card off balance.
For the sentiment, I used the Hide and Peek set again, stamping on kraft cardstock and heat embossing with gold powder. After die‑cutting, I added a truffle cardstock backer for contrast and adhered it to the card front.
I hope these projects bring a little fall warmth to your craft room. I can’t wait to see what you create with the Cozy Season Collection!
What Fall Technique Are You Loving Right Now?
Do you prefer repetitive stamping, ink blending, die‑cutting, or shaker cards during the cozy season? I’d love to hear what you’re working on.
Thank you so much for stopping by today. Your support means the world, and when you use my affiliate links, it helps me continue bringing you fresh inspiration—at absolutely no cost to you.
Supply List
Hero Arts Cozy Season Collection
- Hero Arts Hide and Peek Stamp & Cut Hide and Peek Dies
- Hero Arts Lovely Little Leaves Dies
- Hero Arts Pumpkin Ink
- Hero Arts Fawn Ink
- Hero Arts Cranberry Ink
- Hero Arts Embossing Ink
- Brutus Monroe Penny Embossing Powder
- Gold Embossing Powder
- Spellbinders Mirror Gold Cardstock
- Acetate Sheets
- Foam Tape
- Double‑Sided Adhesive
- Liquid Adhesive
- Spellbinders Classic White Cardstock
- Kraft Cardstock
- Spellbinders Raven Cardstock
- Spellbinders Truffle Cardstock
- Platinum 6 Die Cutting and Embossing Machine
- Scoring Board
- Paper Trimmer
- Stamp Positioning Tool



Leave a Reply