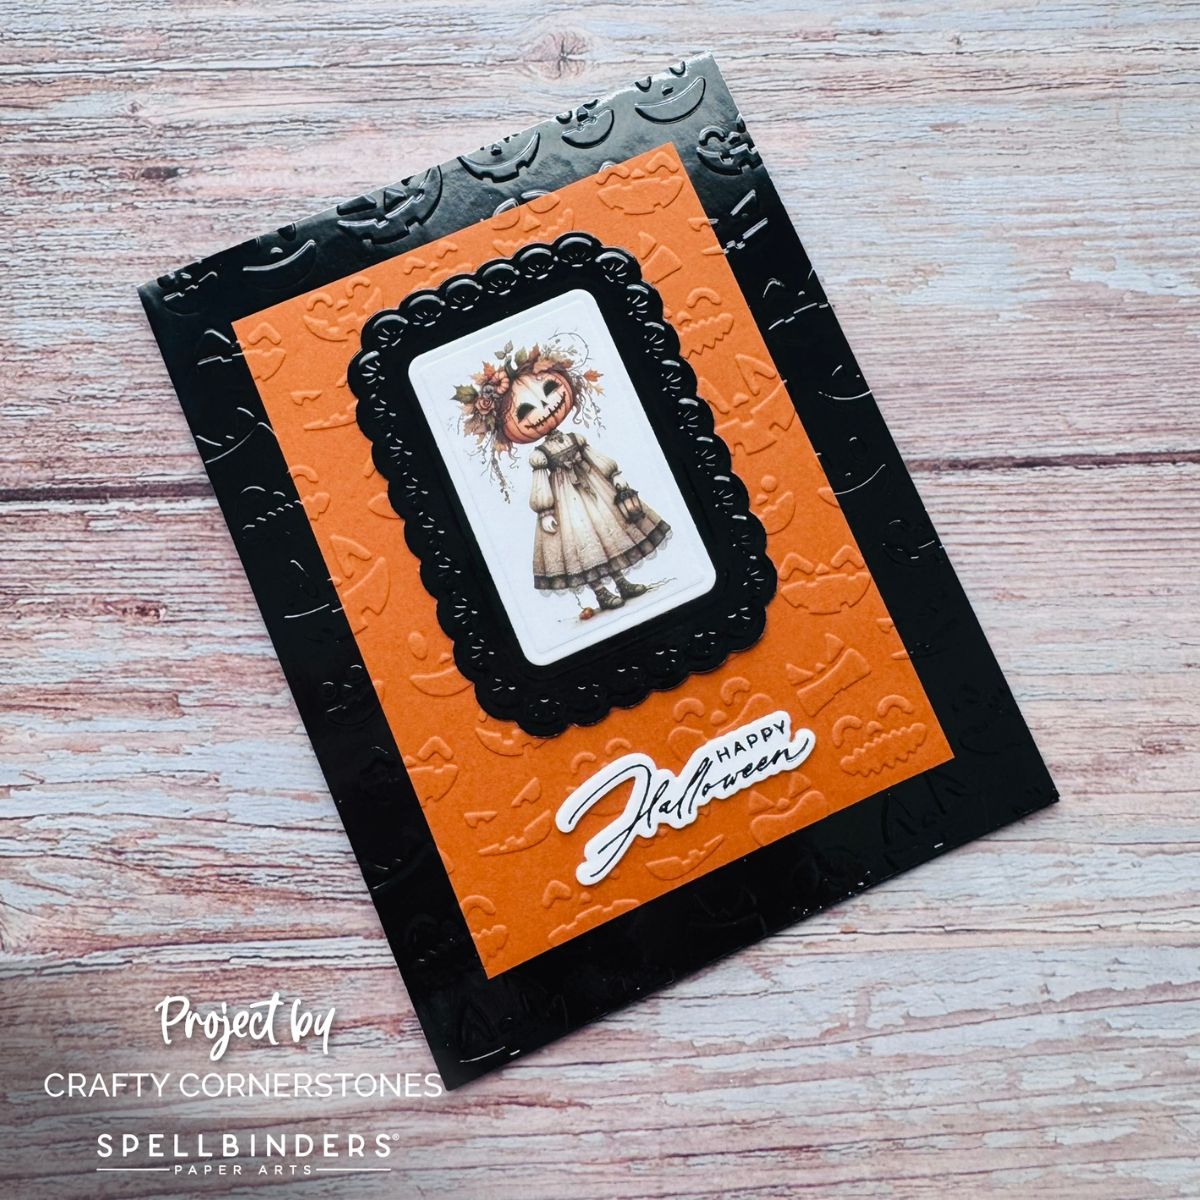
A Halloween-inspired project featuring the Spellbinders Scalloped Frames 3D Emboss and Cut Folder
A Quick and Fun Halloween Card
Today I made a quick card featuring the new Scalloped Frames 3D Emboss and Cut Folder — and I am totally in love with this folder! Since I’m in the Halloween mood, I paired it with the Tricks and Treats Rub-On’s and the Embossing Folder of the Month for August 2026, Happy Jacks, to create this festive project.

Applying the Rub-On
The rub-on was super easy to apply. I decided to apply it first, then die cut. Tip: I like using my embossing machine for rub-ons — the pressure is perfect! I use the standard sandwich for die cutting but add a thin piece of cardboard over the top. This gives just the right amount of extra pressure and prevents plate lines from transferring to the rub-on. Nothing worse than a rub-on that’s only half applied!
With the rub-on in place, I used the coordinating center pieces from the emboss and cut folder to cut my image.
Creating the Frame
For the frame, I selected Black Mirror cardstock and chose to cut and emboss at the same time. One of the things I love about this folder is its versatility — you can emboss only, cut only, or combine both. I used one piece to just cut the rub-on image and another to cut and emboss the black mirror cardstock.


Once cut, I adhered the rub-on piece and the embossed frame together and set them aside for final assembly.
Building the Background
For the background, I used the Happy Jacks Embossing Folder. I cut a piece of terracotta cardstock to my desired size and a second piece of black mirror cardstock to 4.25” x 5.5”.
I embossed each piece separately, but you could secure them together and emboss in one go. When embossing separately, I taped the first embossed piece back into the folder and lined up the second piece so the design continued seamlessly. Once aligned, I slipped the embossed piece out, closed the folder, and embossed the second piece. Then I secured them together — definitely the harder way, but a great workaround if you forget to emboss both at once!
Foiling the Sentiment
For my sentiment, I used Black Glimmer foil with the Happy Halloween Sentiments Press and Foil and Die Set. I cut the foiled sentiment along with two additional die-cut pieces and adhered them together for added dimension.
Tip: Since the “H” in “Happy” is so delicate, layering die cuts is a great way to add dimension without crushing the sides of the sentiment or dealing with tricky foam tape placement.
Final Assembly
With all my pieces ready, assembly was quick and satisfying. This card came together fast but still feels detailed and festive — perfect for Halloween crafting!
Creative Possibilities
I can’t wait to see what you do with this folder! I’m thinking about cards or tags with photos in the center — maybe Christmas flowers or a tree, Valentine hearts, or even an Easter bunny. The ideas are limitless!
What will you make? I’d love to hear your ideas and see your creations!
Thank you so much for stopping by Crafty Cornerstones. I truly appreciate you using my affiliate links — they help me continue bringing you creative content at no cost to you.
Supply List
- Spellbinders Scalloped Frames 3D Emboss and Cut Folder
- Spellbinders Happy Jacks Embossing Folder (August 2026 Club)
- Spellbinders Happy Halloween Sentiments Press and Foil and Die Set
- Spellbinders Tricks and Treats Rub-On’s
- Black Mirror cardstock
- Terracotta ColorWheel cardstock
- Black Glimmer foil
- Platinum 6 Die Cutting Embossing Machine
- Thin cardboard (for rub-on pressure adjustment)
- Scoring Board
- Paper Trimmer
- Adhesive



Leave a Reply