Spellbinders Advent Calendar Day 19 – A Sentiment Stamp Set for Year-Round Crafting
Spellbinders Day 19 – Sentiments That Work Beyond the Advent Calendar
One of the things I appreciate most about the Spellbinders Advent Calendar is how thoughtfully it is put together. Day 19 delivered a sentiment stamp set that is not only perfect for projects created with the Advent Calendar, but versatile enough to use all year long with items already in your stash.
This kind of product is always a win in my book—something that continues to earn its keep long after the countdown is over.
A Sentiment That Made Me Smile
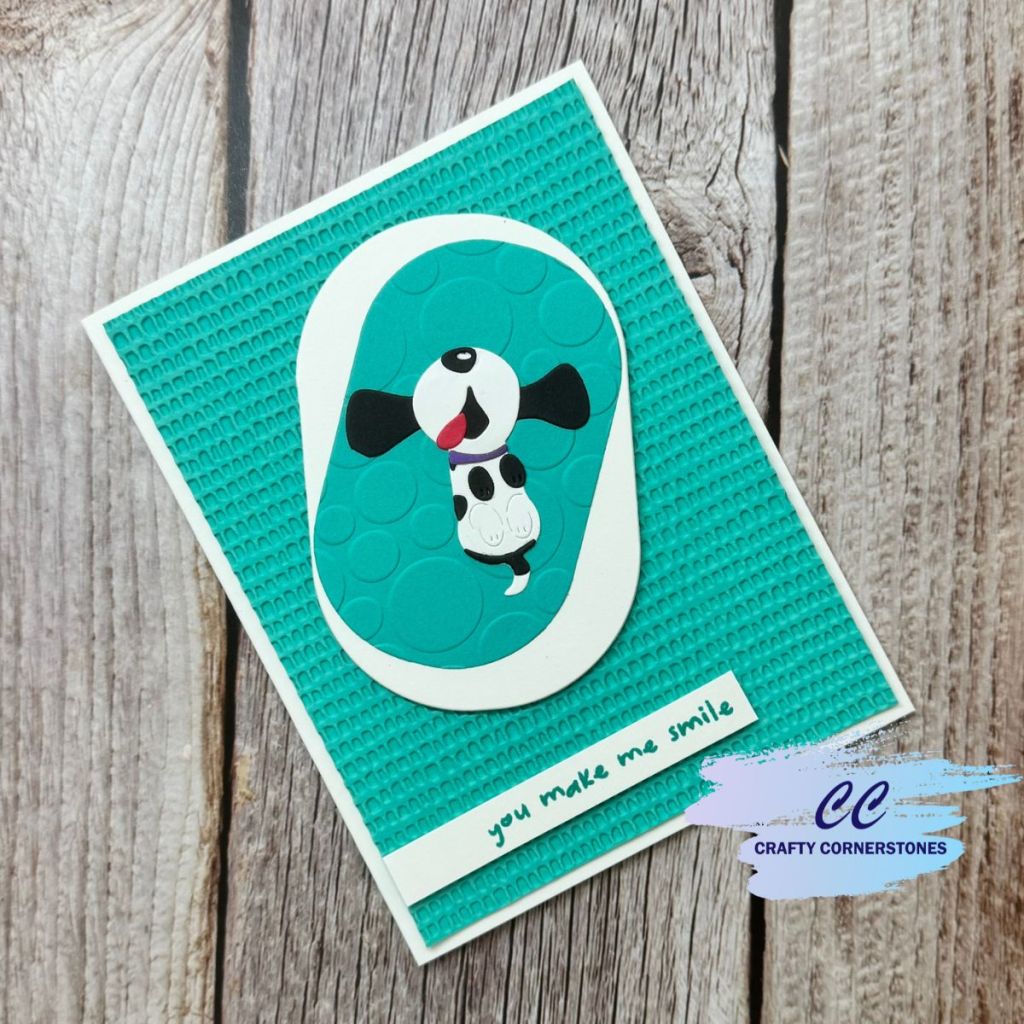
For today’s card, I featured the “you make me smile” sentiment. As soon as I saw it, I knew exactly what image I wanted to pair it with—the dog from Day 1. That little pup just makes me smile every time, so it felt like the perfect match.
Assembling the Dog Image
I started by cutting and assembling the dog from Day 1 using scraps of black, white, red, and purple cardstock. Using scraps is one of my favorite ways to stretch supplies, especially when working with die-cut images that don’t require large pieces of cardstock.
Creating a Grounded Focal Panel
To ground the image on the card, I cut two ovals using the Essential Stylish Ovals Die Set. One was cut from white cardstock and the other from Spellbinders ColorWheel Teal Topaz cardstock.
The Teal Topaz oval was embossed using the Party Spots Embossing Folder. I layered the two ovals together, slightly offset at an angle, and adhered the dog image to the top of this grounding panel.
Building the Card Base
For the main panel, I cut another piece of Teal Topaz cardstock to 4 x 5.25 inches and embossed it using the Dimpled Embossing Folder. I chose to use the debossed side of the panel for added interest and texture. This panel was then adhered to a white A2 card base.
Stamping and Placing the Sentiment
To coordinate with the Teal Topaz cardstock, I used Oceanside ink from Concord & 9th—my closest color match. I stamped the sentiment onto white cardstock and trimmed it to approximately ½ inch wide by about 3 inches long.
When trimming the sentiment, I left about an inch of white space on the front side and trimmed closer to the words on the opposite end. This allowed the sentiment to extend out from one side of the card for a bit of visual movement.
Pro Tip: Swatch Your Supplies
Swatching your products—inks, cardstock, markers, paints, and more—makes color matching across your stash so much easier. It does take some time upfront, but it has saved me countless hours in the long run and is absolutely worth the effort.
Final Assembly
For the final assembly, I added foam tape to both the sentiment strip and the oval grounding panel to give the card dimension. The dog image was adhered toward the top of the card, leaving room below for the sentiment to tuck neatly underneath.
This card came together fairly quickly, but it truly makes me smile—and I know it will bring a smile to the recipient as well.
Let’s Chat
Do you have a favorite sentiment that you find yourself reaching for over and over again when creating “just because” cards?
Supply List
- Spellbinders Advent Calendar Day 1 – Dog Die (Sold Out)
- Spellbinders Advent Calendar Day 19 – Sentiment Stamp Set (Sold Out)
- Essential Stylish Ovals Die Set – Spellbinders
- Party Spots Embossing Folder – Spellbinders (The Birthday Celebrations Bundle)
- Dimpled Embossing Folder – Spellbinders
- Spellbinders ColorWheel Cardstock – Teal Topaz
- White Cardstock
- Concord & 9th Oceanside Ink
- Foam Tape
- Die Cutting Machine
- Liquid Adhesive
Thank you so much for stopping by Crafty Cornerstones. Be sure to subscribe so you don’t miss future projects. Using my affiliate links is never an extra cost to you and helps me continue sharing crafty inspiration. I’d also love to hear from you—leave a comment below and let me know what you’re creating.
Missed a 2025 Advent Project? Links Below
Spellbinders 2025 Advent
- Spellbinders Advent Day 1
- Spellbinders Advent Day 2
- Spellbinders Advent Day 3
- Spellbinders Advent Day 4
- Spellbinders Advent Day 5
- Spellbinders Advent Day 6
- Spellbinders Advent Day 7
- Spellbinders Advent Day 8
- Spellbinders Advent Day 9
- Spellbinders Advent Day 10
- Spellbinders Advent Day 11
- Spellbinders Advent Day 12
- Spellbinders Advent Day 13
- Spellbinders Advent Day 14
- Spellbinders Advent Day 15
- Spellbinders Advent Day 16
- Spellbinders Advent Day 17
- Spellbinders Advent Day 18
Pink and Main 2025 Advent
- Pink and Main Day 1
- Pink and Main Day 2
- Pink and Main Day 4
- Pink and Main Day 5
- Pink and Main Day 6
- Pink and Main Day 7
- Pink and Main Day 8
- Pink and Main Day 9
- Pink and Main Day 10
- Pink and Main Day 11
- Pink and Main Day 12
- Pink and Main Day 13
- Pink and Main Day 14
- Pink and Main Day 15
- Pink and Main Day 16
- Pink and Main Day 17
- Pink and Main Day 18


Leave a comment