One of my favorite things about an Advent Calendar is discovering products that don’t just work for one project but continue to add value long after the countdown is over. Day 8 of the Pink and Main Advent Calendar 2025 delivered exactly that with a versatile assortment of dies designed for focal points and sentiments from previous days.
These are the kinds of dies that easily become staples in your craft room. Squares, sentiment outlines, and layering elements can be mixed and matched across countless card designs. Today’s project is a great example of how cohesively this entire advent calendar works together.
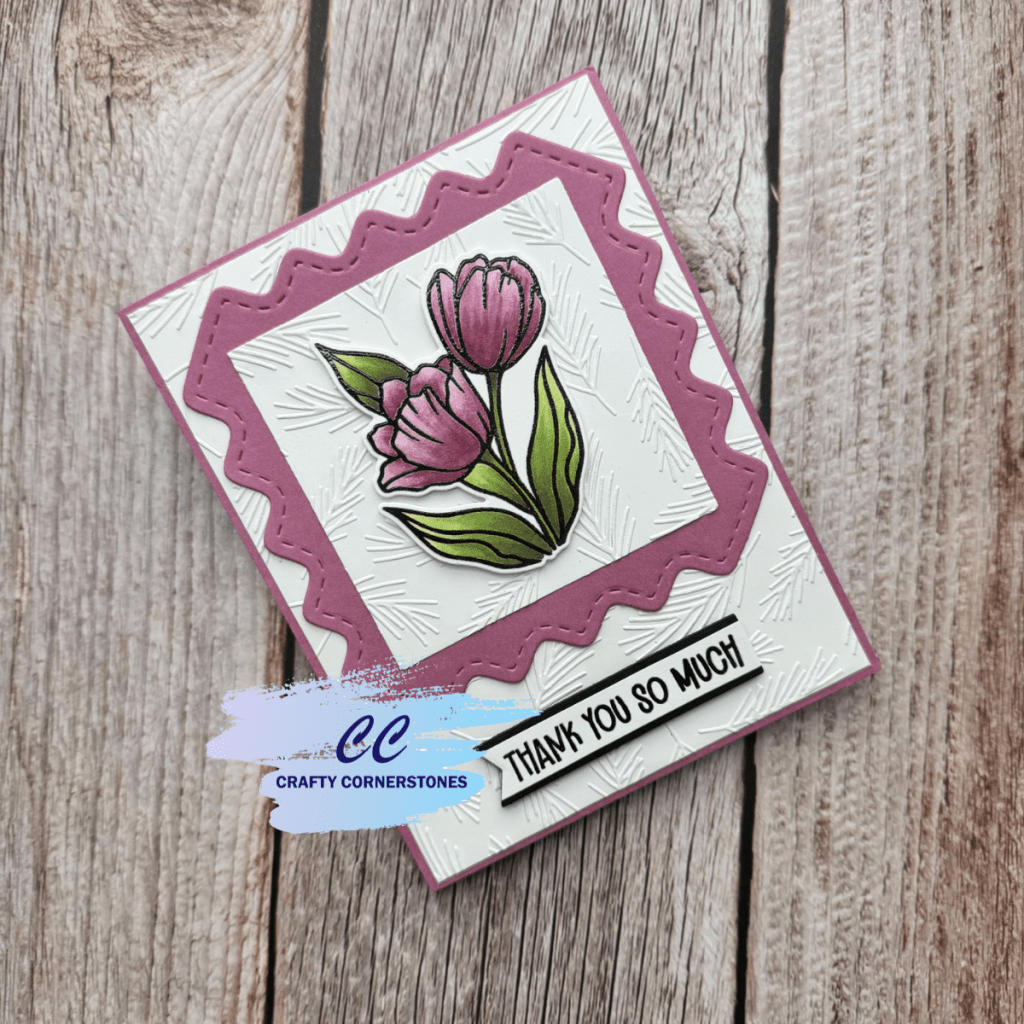
Day 8 Advent Dies – Simple Shapes with Big Impact
For today’s card, I used three of the dies included in the Pink and Main Day 8 Advent Calendar:
- The 3” x 3” square die
- The 4” x 4” wavy-edge square die
- One of the sentiment outline dies
To really highlight how the advent calendar builds on itself, I also brought in the Tulip stamp from Day 4 and its matching die from Day 7. This kind of coordination makes designing easy and keeps everything feeling intentional.
Choosing a Color Palette That Works Together
Before committing to my tulip colors, I selected my background cardstock first. This helps ensure everything complements rather than competes. I settled on Briar Rose cardstock from Concord & 9th, then pulled Altenew Alcohol Markers in similar shades to keep the palette soft and cohesive.
Pro Tip: Swatch Everything
Swatching your cardstock, alcohol markers, inks, embossing powders and more makes color matching so much easier. Having these references on hand saves time and reduces guesswork when starting a project.
Stamping and Heat Embossing for Alcohol Marker Coloring
For both the flower and the sentiment, I stamped the images twice:
- First with black ink
- Then with embossing ink and heat embossed using clear embossing powder
This is my go-to technique when coloring with alcohol markers. Even when using alcohol marker–friendly ink, the clear embossing adds an extra layer of protection against smearing. Another bonus is avoiding stray black embossing powder specks that always seem to find their way onto my projects.
Coloring the Tulips with Subtle Contrast
To create gentle contrast between the flowers, I used slightly different shades of mauve and pink for each bloom.
First Tulip:
- R602
- R523
- R355
Second Tulip:
- R603
- R614
- R437
Stems and Leaves:
- G743
- G735
- G713
- G801
The differences are subtle, but they add depth and keep the flowers from blending together.
Once coloring was complete, I used the Day 7 coordinating die to cut out the image. I prefer cutting after coloring so I have more area to hold onto while turning the piece, but cutting first works just as well if that’s your preference.
Building the Layered Card Design
For the base layers, I started with:
- A 4.25” x 5.5” card base
- A 4” wavy square die cut from Briar Rose cardstock
I added white mat layers for contrast:
- 4” x 5.25” white cardstock
- A 3” square die cut from white cardstock
Both white layers were embossed using the Pine Branch Embossing Folder from the Pink and Main Joyful Holiday event, adding subtle texture without overwhelming the design.
After adhering each mat layer to its coordinating piece, I placed the wavy square layer in the top two-thirds of the card, leaving space below for the sentiment.
Finishing Touches and Final Assembly
The sentiment was layered with a black backer, trimmed so the black shows only at the top and bottom, creating a subtle flagged detail on one end. I popped the sentiment up with foam tape and centered it along the bottom third of the card.
For the final focal point, I added foam tape behind the tulip image and adhered it to the center of the layered squares.
Why I Love This Advent Calendar
Projects like this really highlight how thoughtfully designed the Pink and Main Advent Calendar is. Each day builds on the last, giving you tools that work together to create polished, coordinated cards with ease.
Are you enjoying the Pink and Main Advent Calendar as much as I am? Have you thought about signing up for the upcoming Pink and Main Birthday Bash? The instructor lineup alone makes it an event worth watching.
DO NOT WAIT SIGN UP TODAY

EVENT KITS WILL NOT SHIP UNTIL CLOSER TO THE EVENT – PLEASE DO NOT ADD OTHER ITEMS TO YOUR PURCHASE!
REMINDER! If you’re signing up for the Birthday Bash Virtual Event, the kit will not ship for a few months! If you add anything else to your order, it will be delayed until the kits ship!
Missed a 2025 Advent Project? Links Below
Spellbinders 2025 Advent
- Spellbinders Advent Day 1
- Spellbinders Advent Day 2
- Spellbinders Advent Day 3
- Spellbinders Advent Day 4
- Spellbinders Advent Day 5
- Spellbinders Advent Day 6
- Spellbinders Advent Day 7
- Spellbinders Advent Day 8
Pink and Main 2025 Advent
- Pink and Main Day 1
- Pink and Main Day 2
- Pink and Main Day 4
- Pink and Main Day 5
- Pink and Main Day 6
- Pink and Main Day 7
Thank you so much for stopping by Crafty Cornerstones. If you enjoy these projects, be sure to subscribe so you don’t miss future tutorials. Using my affiliate links is never an extra cost to you and helps support the creation of more crafty inspiration. I always love reading your comments, so feel free to leave one below.
Supplies Used
- Pink and Main Day 8 Advent Dies (Sold Out)
- Alternate – Square Nesting Dies
- Alternate – Scallop Square Dies
- Alternate – Layered Scallops Square Dies
- Alternate – Reverse Scallop Square Dies
- Pink and Main Tulip Stamp (Day 4)
- Alternate – Gorgeous Vases
- Pink and Main Tulip Coordinating Die (Day 7)
- Alternate – Gorgeous Vases Die set
- Concord & 9th Briar Rose Cardstock
- White Cardstock
- Black Cardstock
- Altenew Alcohol Markers
- R602, R523, R355
- R603, R614, R437
- G743, G735, G713, G801
- Pine Branch Embossing Folder (Pink and Main)
- Alternate – Spellbinders Forevergreen embossing Folder
- Foam Tape
- Die Cutting Machine
- Heat Tool
- Liquid Adhesive


Leave a reply to Watercolored Rose Card with No-Line Stamping – Crafty Cornerstones Cancel reply