Sometimes the simplest cards are the ones people love the most. Today’s Spellbinders Day 7 gift was a beautiful set of butterfly stencils that are simple, elegant, and completely timeless. Once again, Spellbinders nailed it with a product that offers multiple uses and works perfectly for quick cards or more detailed designs.
For today’s project, I created a clean and simple Happy Birthday card that came together in just a few minutes. I always have to remind myself that handmade cards are appreciated whether they take hours to make or just a short crafting session.
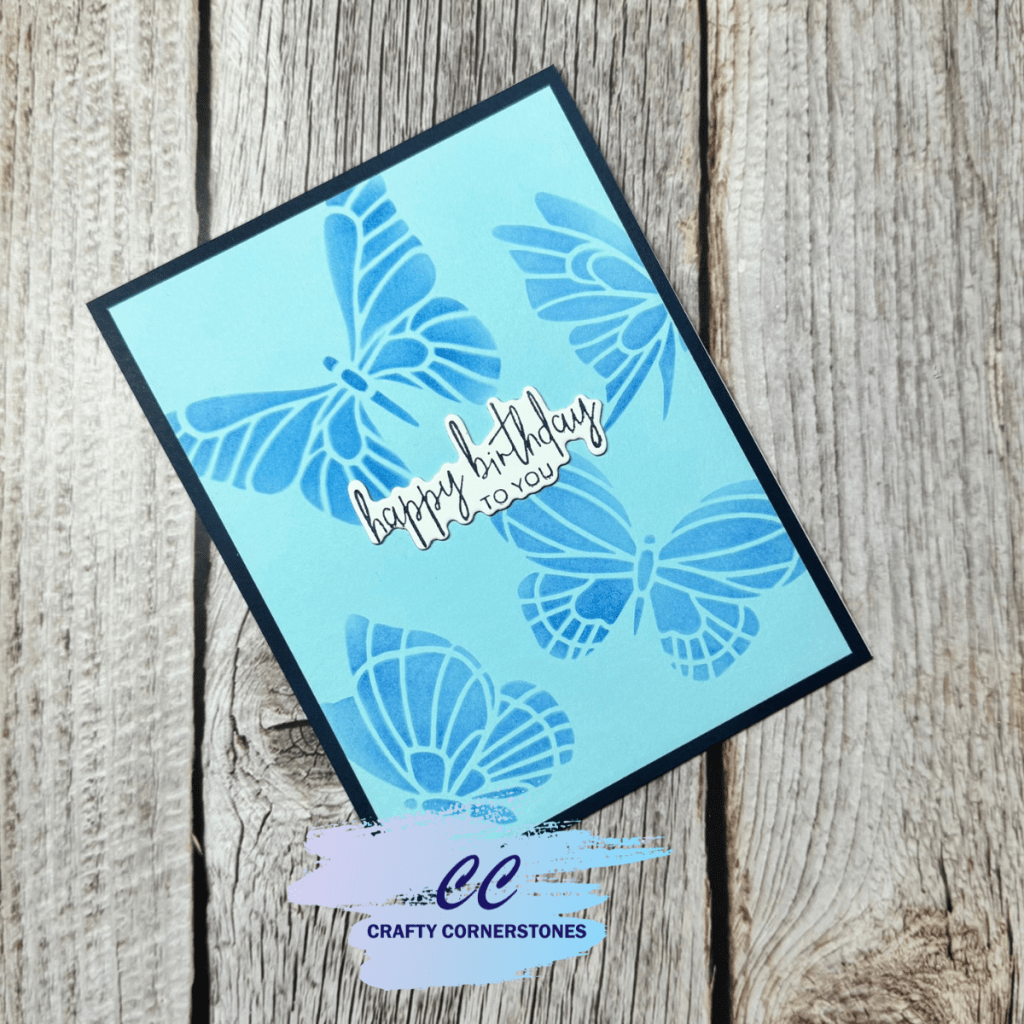
Stenciling: Tone-on-Tone Background
I started with a piece of Spellbinders Breeze ColorWheel cardstock. Using Blueberry ink from Concord & 9th, I stenciled the butterflies directly onto the Breeze cardstock to create a soft tone-on-tone effect. This is such an easy way to add interest without overwhelming the design.
Once the stenciling was complete, I trimmed the panel down to 4 inches by 5.25 inches and set it aside while I worked on the sentiment.
Creating a Crisp Birthday Sentiment with BetterPress
For the sentiment, I kept things simple with a classic birthday message. I used the A Little Message Sentiments BetterPress and Dies set along with Midnight ink from Concord & 9th to press the sentiment onto white BetterPress Cotton Paper.
I highly recommend the BetterPress Cotton Paper. It consistently delivers a deep, crisp impression and really elevates even the most simple card designs. After pressing the sentiment, I used the coordinating die to cut it out.
To add a bit of dimension, I cut two additional layers from white cardstock and stacked them behind the pressed sentiment. Foam tape will work just as well here if you prefer.
Simple Card Assembly with Clean Layers
For the card layout, I layered the stenciled butterfly panel onto a 4.25 inch by 5.5 inch panel of Indigo cardstock. Both panels were then adhered to the card base.
I centered the stacked sentiment on the card front and adhered it in place. The layered sentiment adds just enough dimension while still keeping the overall design clean and elegant.
Quick, easy, and elegant — one birthday card complete.
One-Layer Cards or Lots of Dimension?
I really enjoy mixing things up between “one-layer” style cards and more dimensional designs. Both have their place, and sometimes a simple design is exactly what’s needed.
Do you prefer one-layer cards, or do you lean toward more detailed designs with lots of dimension? I would love to hear your thoughts. Leave a comment below and let me know your preference.
Supplies Used
- Spellbinders Butterfly Stencils (Day 7)
- Sold out but try this Butterfly Stencil instead!
- Spellbinders ColorWheel Cardstock – Breeze
- Spellbinders ColorWheel Cardstock – Indigo
- Concord & 9th Ink – Blueberry
- Concord & 9th Ink – Midnight
- Spellbinders A Little Message Sentiments BetterPress & Dies
- Spellbinders BetterPress Cotton Paper
- White cardstock
- Die cutting machine
- BetterPress system
- Adhesive
Missed a 2025 Advent Project? Links Below
Spellbinders 2025 Advent
- Spellbinders Advent Day 1
- Spellbinders Advent Day 2
- Spellbinders Advent Day 3
- Spellbinders Advent Day 4
- Spellbinders Advent Day 5
- Spellbinders Advent Day 6
Pink and Main 2025 Advent
Thank you so much for stopping by Crafty Cornerstones. If you enjoy these projects, be sure to subscribe so you don’t miss future tutorials. Using my affiliate links is never an extra cost to you and helps support the creation of more crafty inspiration. I always love reading your comments, so feel free to leave one below.


Leave a reply to Transform a Toast Die into a Waffle Card – Crafty Cornerstones Cancel reply