Today’s Pink and Main Advent surprise was a fun stencil, and it immediately sparked several ideas. While this stencil could easily be used for party streamers on a birthday card, I’m currently in a wintery mood, so I turned it into a soft snowfall or string-light inspired background for a thank you card.
This is a quick project with lots of versatility, making this stencil a great addition to your craft room.
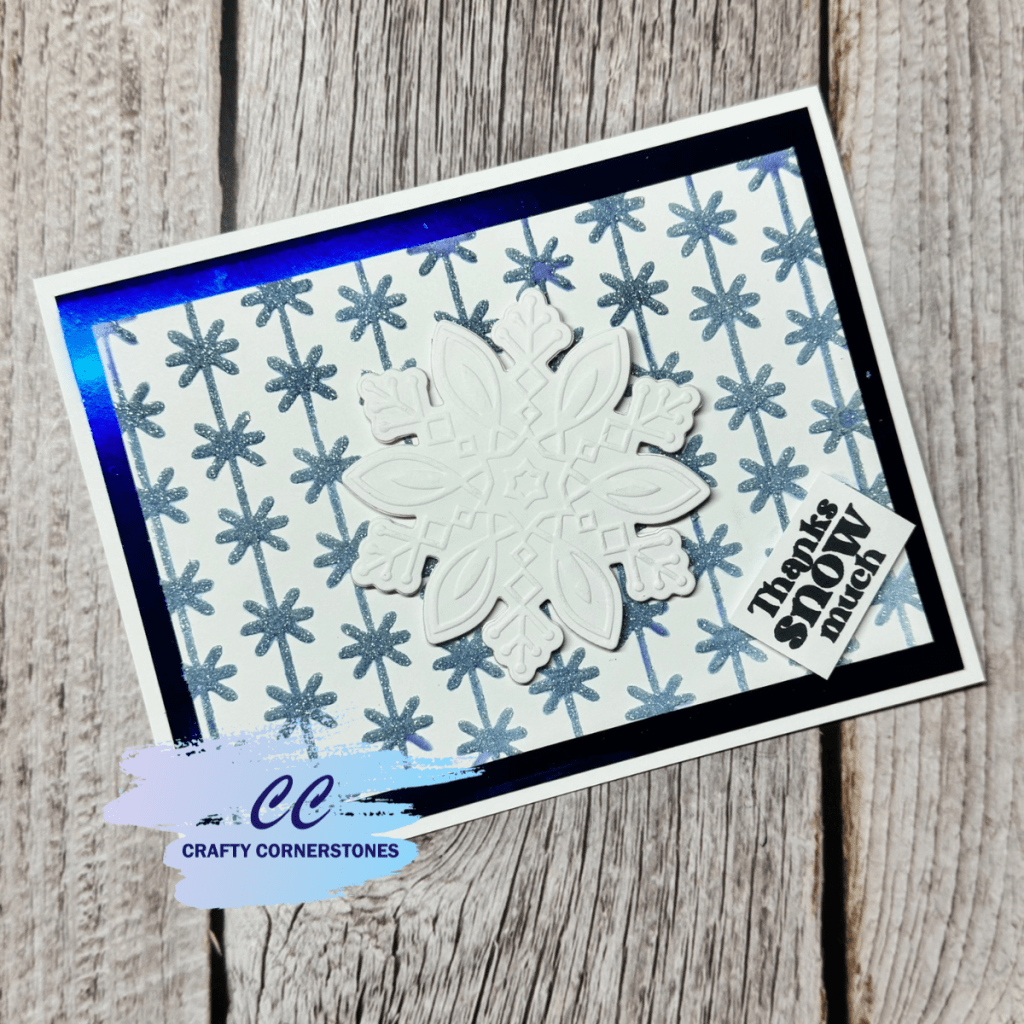
Using the Stencil for a Winter Background
This card came together pretty quickly. I always like to stencil before trimming my panel, which gives me flexibility to decide on the final look later.
I started by stenciling onto white cardstock using Midnight Ink from Concord & 9th. Once the ink was in place, I decided to add a bit of sparkle. Without moving or cleaning the stencil, I layered Gina K Glitter Gel over the top. While that product is no longer available, Starlight Sparkle Gel is a great replacement.
Because the stencil still had ink on it, the glitter paste picked up the Midnight Ink and became lightly tinted, which created a beautiful effect. I set the panel aside to dry completely.
Creating the Focal Point
While the stenciled background was drying, I worked on the focal point and sentiment. To keep the winter theme going, I used the Snowflakes Emboss and Cut Folder from Pink and Main.
I chose to use just one of the snowflakes and cut it out to serve as a simple centerpiece. The added texture from the embossing folder gives the card extra interest without overwhelming the background.
Adding the Sentiment
The sentiment, “Thanks snow much” comes from the Snowflake Sayings stamp set, which coordinates perfectly with the embossing folder. Although I trimmed my sentiment into a simple rectangle, there is a matching die set available for this stamp set if you prefer a die-cut look.
Putting the Card Together
Once the stenciled panel was fully dry, I trimmed it down to 4 ¾” x 3 ½”. I then cut a background panel from blue foil cardstock to 5 ¼” x 4”.
Both panels were adhered to an A2 card base, creating a clean double border effect. For the finishing touches, I popped up the snowflake with foam tape and centered it on the card. The sentiment was also popped up with foam tape and placed at a slight angle in the bottom corner for added movement.
Final Thoughts
I hope you enjoyed today’s quick and easy Pink and Main Advent project. This stencil is incredibly versatile, and I would love to see how you used yours. Let me know in the comments what direction you took with this design.
Thank you so much for stopping by Crafty Cornerstones. If you enjoy these projects, be sure to subscribe so you don’t miss future tutorials. Using my affiliate links is never an extra cost to you and helps support the creation of more crafty inspiration. I always love reading your comments, so feel free to leave one below.
Supplies Used
- Pink and Main Advent 2025 Day 5 Stencil (Sold Out)
- White Cardstock
- Concord & 9th Midnight Ink
- Gina K Glitter Gel (discontinued) or Starlight Sparkle Gel
- Pink and Main Snowflakes Emboss and Cut Folder
- Pink and Main Snowflake Sayings Stamp Set
- Blue Foil Cardstock
- Foam Tape
- A2 Card Base
- Adhesive
- Asphalt Premium Black Dye Ink
- Bearly Arts Precision Craft Glue
Missed a 2025 Advent Project? Links Below
Spellbinders 2025 Advent
- Spellbinders Advent Day 1
- Spellbinders Advent Day 2
- Spellbinders Advent Day 3
- Spellbinders Advent Day 4
- Spellbinders Advent Day 5


Leave a reply to Day 8 Spellbinders Advent – Happy Day Banner Card – Crafty Cornerstones Cancel reply