It is hard to believe it is already December. Where did the year go?
This month, I am working with three Advent calendars and sharing daily projects from Spellbinders, Pink and Main, and Gina K. Designs. If you see something you love, I would truly appreciate you using my affiliate links. They help support Crafty Cornerstones at no additional cost to you.
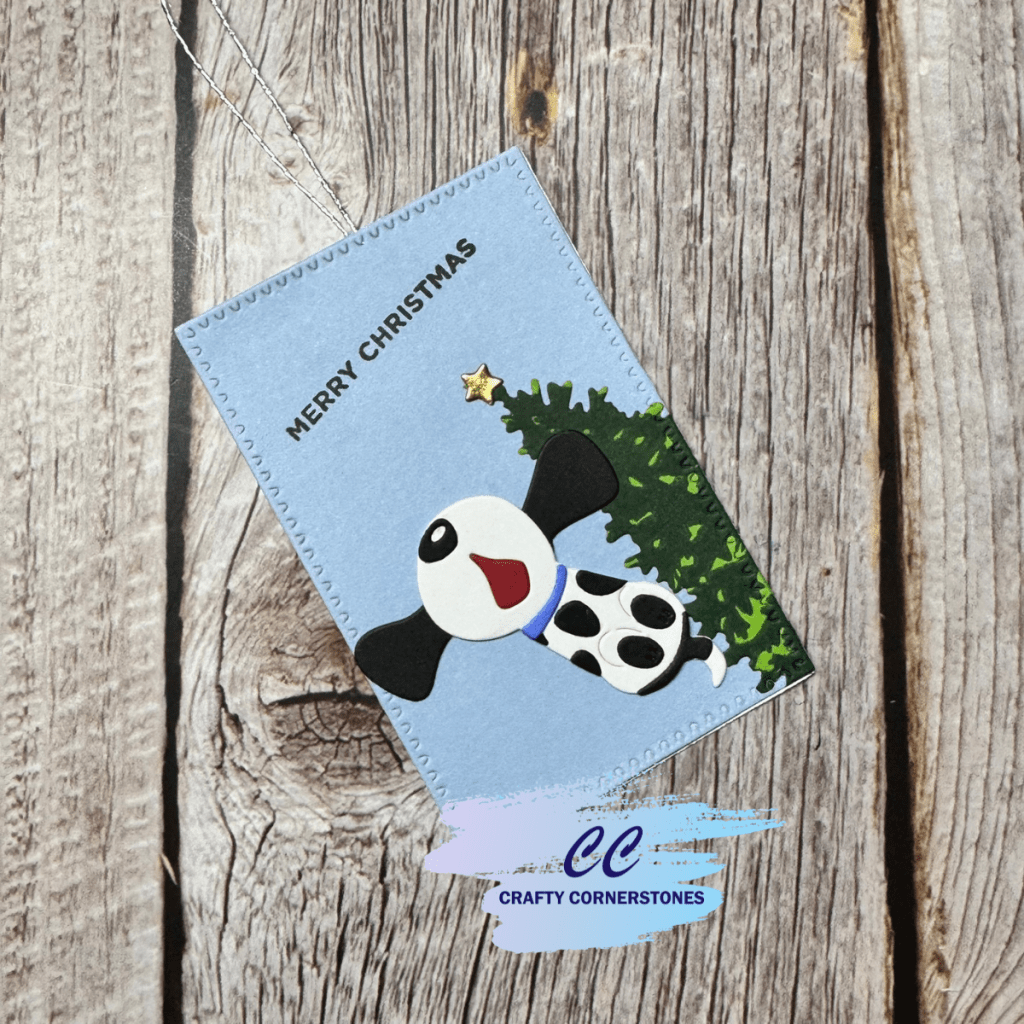
Today begins with Spellbinders Advent Day 1, and the surprise was an adorable dog die set paired with a cute sentiment, I Woof You. I immediately knew I wanted to create a playful Christmas tag featuring a puppy jumping with excitement by the tree.
Designing the Christmas Puppy Tag
Once I had the idea in mind, it was time to gather the supplies that would bring the tag to life. For readers who are new, feel free to explore more of my tutorials in the Project Gallery.
Supplies Used
- Spellbinders Advent of 2025 Day 1 Dog Die Set
- Spellbinders BetterPress of the Month (July 2024) – Christmas Haul
- Spellbinders Nested Tree Frame Dies
- Spellbinders Christmas Mini Greetings Dies (Discontinued, but this set as similar stamp)
- Spellbinders Perfect Touch Rectangles and Tags Dies
- BetterPress System
- Gina K. Designs Dark Spruce Ink
- Assorted cardstock scraps (black, white, lime green, red, gold)
Creating the Dog and Christmas Tree Elements
I wanted the dog to have a classic black-and-white look, so I cut the die pieces using black and white cardstock scraps. The mouth was cut from red cardstock for a sweet pop of color.
The gold star for the tree was also created from leftover scrap paper.
BetterPress Christmas Tree
To create the tree, I used the BetterPress System with Gina K Dark Spruce ink pressed onto a lime green cardstock scrap. This produced a beautiful two-tone green effect. Afterward, I used the coordinating die to cut it out.
Building the Tag Base
I cut the tag base twice—once from blue cardstock for the front and once from white cardstock for the back.
Before adhering anything, I arranged all the die-cut pieces loosely on the tag to find the perfect placement. After positioning everything visually, I stamped the “Merry Christmas” sentiment directly onto the tag using a stamp positioner.
Once the sentiment was stamped, I adhered all the pieces in place.
For the tag string, I used the same method I shared in this post where I sandwich the string between the front and back tag layers for a clean finish.
Finished Puppy Tag
And just like that, Day 1 is complete. I now have a much-needed Christmas tag ready for gifting, and it was such a fun way to start the Advent season.
I hope this inspires you to use your own Day 1 dies. I would love to hear what you created—share your versions in the comments below.


Leave a reply to Discovering Versatile Dies: Day 8 Pink and Main Advent Calendar – Crafty Cornerstones Cancel reply