A Fun and Lighthearted Handmade Card for Those “Just One of Those Days” Moments
There are days, and sometimes entire weeks, when absolutely nothing seems to go right. The kind of stretch where it almost becomes funny how much is piling up. Today’s card was inspired by exactly those moments.
I wanted to create something fun and lighthearted for when someone is just going through it and could use a smile. While pulling supplies for this project, I came across the Sassy Chickens stamp set from Kat Scrappiness, and it was the perfect fit. This set is an absolute must-have for any craft room. It is packed with personality, snark, and just the right amount of sass.
Choosing the Card Layout
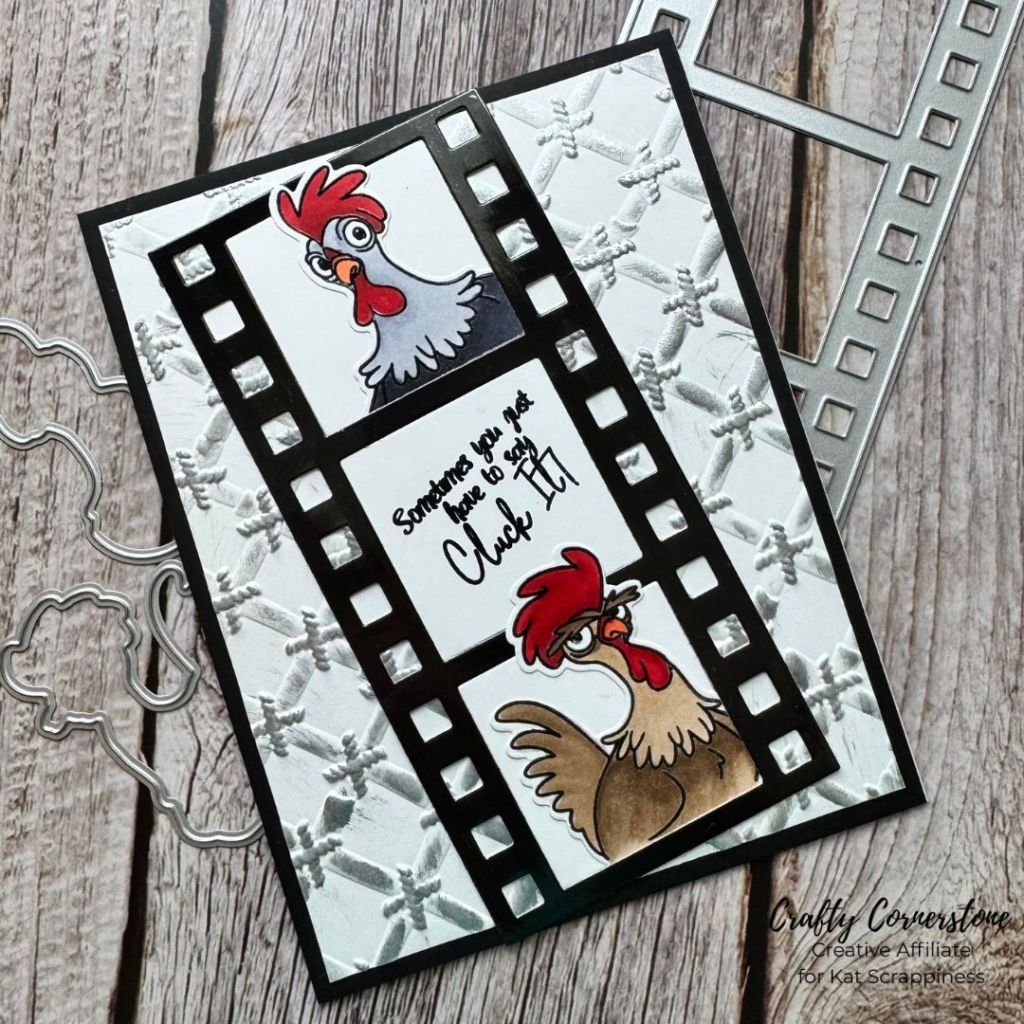
This card actually started with the layout rather than the images. I had a film strip die from Kat Scrappiness that immediately caught my eye. It reminded me of the frames in a comic strip and felt like the perfect way to frame a small scene.
Once I had the layout idea in place, I started looking for images that would fit inside the film strip openings. Two chickens from the Sassy Chickens set had the perfect expressions and fit beautifully within the frames. As fun as the chickens are, the true star of this card is the sentiment.
From the Sassy Chickens stamp set, I chose the perfectly snarky phrase:
“Sometimes you just have to say CLUCK IT!”
It tied everything together and really set the tone for the card.
Preparing the Film Strip Elements
To create dimension and contrast, I cut the film strip die twice. One was cut from glossy black cardstock and the other from white cardstock. The glossy black piece would become the main film strip, while the white cardstock would be used for the inside frame pieces. The leftover portions were set aside for a future project.
Stamping and Embossing the Images
For the chickens, I used my go-to method when coloring images with alcohol markers. Using a stamping tool, I first stamped the images onto white cardstock with black ink. Then I restamped them using embossing ink, added clear embossing powder, and heat set the powder until it melted.
A quick tip: I like to heat emboss from the back of the cardstock. I find that this gives a smoother finish and reduces the risk of overheating the powder.
While everything was out, I used the same process for the sentiment, stamping it onto one of the white film strip inset pieces.
Coloring the Chickens
The chickens were colored using Olo markers. I prefer to color my images before die cutting, as it gives me more area to hold onto while coloring, but you can absolutely die cut first if that is your preference.
The colors I used for this project are listed in the supply list below. Once the coloring was complete, I used the coordinating die set to cut out the chickens.
Adding Texture to the Background
With all of my main elements ready, I started arranging everything and quickly realized the card needed something extra in the background. I decided to use the Bamboo Screen embossing folder from Spellbinders, which resembles chicken wire and fit the theme perfectly.
I embossed a panel of white cardstock and then lightly swiped silver pigment ink across the raised areas to bring out the texture. I used Lisa Horton Crafts Cloud 9 Silver Shine pigment ink. Since pigment ink takes longer to dry than dye ink, I set the panel aside for about 15 minutes.
Assembling the Card
While the background dried, I worked on assembling the film strip. I used tape on the back to hold the white inset pieces in place and tucked the chickens into their frames. Once everything was positioned the way I wanted, I added additional tape to secure the pieces so they could be adhered as one unit.
After the pigment ink was fully dry, I trimmed the embossed background panel to 4 x 5.25 inches and layered it onto a piece of glossy black cardstock cut to 4.25 x 5.5 inches. This became the main card panel.
The chicken film strip was adhered at a slight angle for added interest, and the entire panel was then attached to a white A2 card base.
Finished Card Thoughts
I absolutely love how this card turned out. It has just the right amount of sass while still being fun and lighthearted. It is the kind of card that can bring a chuckle and hopefully a smile to someone who may be having a rough day.
I enjoy making this style of card but often forget to. This year, I am challenging myself to create more fun and silly cards. Do you enjoy making snarky or humorous cards?
Supplies
- Kat Scrappiness Sassy Chickens Stamp Set
- Kat Scrappiness Sassy Chickens Coordinating Dies
- Kat Scrappiness Film Strip Die
- Spellbinders Bamboo Screen Embossing Folder
- White Cardstock
- Glossy Black Cardstock
- Black Ink
- Clear Embossing Ink
- Clear Embossing Powder
- Heat Tool
- Olo Alcohol Markers: R1.5, R0.6, OR1.6, OR1.3, CG3, CG5, CG7, CG9, O4.1, O4.3, O7.1, O7.3, O7.7
- Lisa Horton Crafts Cloud 9 Silver Shine Pigment Ink
- Die Cutting Machine
- Stamping Tool
- Adhesive and Tape


Leave a comment