Spellbinders Advent Day 16 – Creating a Simple Yet Impactful Gift Tag with Banner Dies
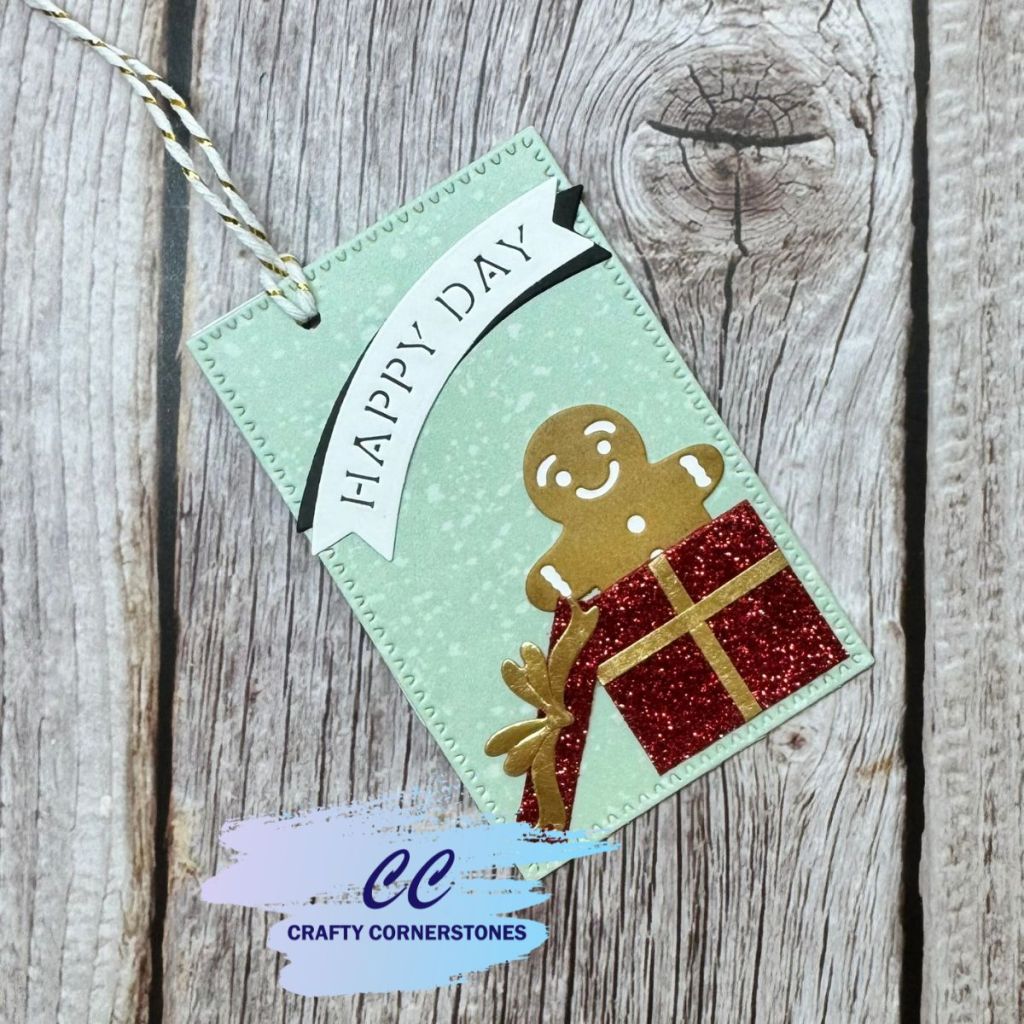
Spellbinders Day 16 brought us a set of banner dies, and this is one of those gifts that can be used all year long. Banner dies are incredibly versatile and work beautifully on cards, scrapbook layouts, and even small projects like gift tags. For today’s project, I decided to keep things simple and use the banner dies to create a festive gift tag that helps elevate any present.
Making handmade gift tags is a great way to add an additional personal touch. This design comes together quickly but still has enough detail to feel special.
Creating the Banner Sentiment
I began with the banner die sentiment “Happy Day.” I cut the banner with the sentiment insert from white cardstock, then cut the banner base on its own from Spellbinders Raven Cardstock.
Layering the lighter sentiment over the darker banner adds contrast and helps the words stand out. I adhered the two pieces together at a slight angle for visual interest and set the finished banner aside.
Die Cutting and Coloring the Gingerbread Man
For the main decorative element, I used the Christmas Cocktails Die Set and focused on the gingerbread man.
Both layers of the gingerbread man were die cut from white cardstock. I colored the top layer using Olo markers, starting with YO 2.7 and then layering O 7.7 over the top. This combination created the warm gingerbread color I was looking for.
Once colored, I adhered the two gingerbread layers together and set the piece aside.
Assembling the Gift Box Accent
To add a little shine, I created a small gift embellishment for the tag.
- The bow and ribbon were die cut from Spellbinders Brushed Gold Cardstock
- The gift box and lid were cut from scrap red glitter cardstock
I assembled the box and lid and set them aside until everything was ready to come together.
Building the Tag Base
For the tag itself, I used the Perfect Touch Rectangles and Tag Die Set.
- One large tag was cut from light green patterned paper
- A second large tag was cut from white cardstock
- Both layers were stacked with the etched designs facing outward
I also cut a smaller tag from white cardstock. This smaller tag serves as the writable surface, allowing the recipient to reuse the larger decorative tag if they wish.
Final Assembly
With all the elements prepared, I laid everything out until I was happy with the placement. Once satisfied, I adhered everything down.
To finish the tag:
- I lined the smaller tag behind the layered larger tags
- Used a hole punch to punch through all three layers
- Added tag string to complete the project
The result is a simple but polished gift tag.
Final Thoughts
Today’s Spellbinders Day 16 gift was simple but incredibly useful. Banner dies are a staple that work well beyond the holidays, making them a great addition to any die collection.
What did you make with your banner dies?
Supply List
- Spellbinders Banner Dies (Day 16) (Sold Out)
- Alternate – Handmade Sentiments Etched
- Alternate – La Dolce VIta Banners Etched
- Alternate – Make it Merry Sentiments Etched Dies
- Spellbinders Perfect Touch Rectangles and Tag Die Set
- Spellbinders Christmas Cocktails Die Set
- Spellbinders Raven Cardstock
- Spellbinders Brushed Gold Cardstock
- White Cardstock
- Light Green Patterned Paper
- Red Glitter Cardstock
- Olo Markers: YO 2.7, O 7.7
- Die Cutting Machine
- Adhesive
- Hole Punch
- Tag String
Missed a 2025 Advent Project? Links Below
Spellbinders 2025 Advent
- Spellbinders Advent Day 1
- Spellbinders Advent Day 2
- Spellbinders Advent Day 3
- Spellbinders Advent Day 4
- Spellbinders Advent Day 5
- Spellbinders Advent Day 6
- Spellbinders Advent Day 7
- Spellbinders Advent Day 8
- Spellbinders Advent Day 9
- Spellbinders Advent Day 10
- Spellbinders Advent Day 11
- Spellbinders Advent Day 12
- Spellbinders Advent Day 13
- Spellbinders Advent Day 14
- Spellbinders Advent Day 15
Pink and Main 2025 Advent
- Pink and Main Day 1
- Pink and Main Day 2
- Pink and Main Day 4
- Pink and Main Day 5
- Pink and Main Day 6
- Pink and Main Day 7
- Pink and Main Day 8
- Pink and Main Day 9
- Pink and Main Day 10
- Pink and Main Day 11
- Pink and Main Day 12
- Pink and Main Day 13
- Pink and Main Day 14
- Pink and Main Day 15
Thank you so much for stopping by Crafty Cornerstones. Be sure to subscribe so you don’t miss future projects. Using my affiliate links is never an extra cost to you and helps me continue sharing crafty inspiration. I’d also love to hear from you—leave a comment below and let me know what you’re creating.


Leave a comment