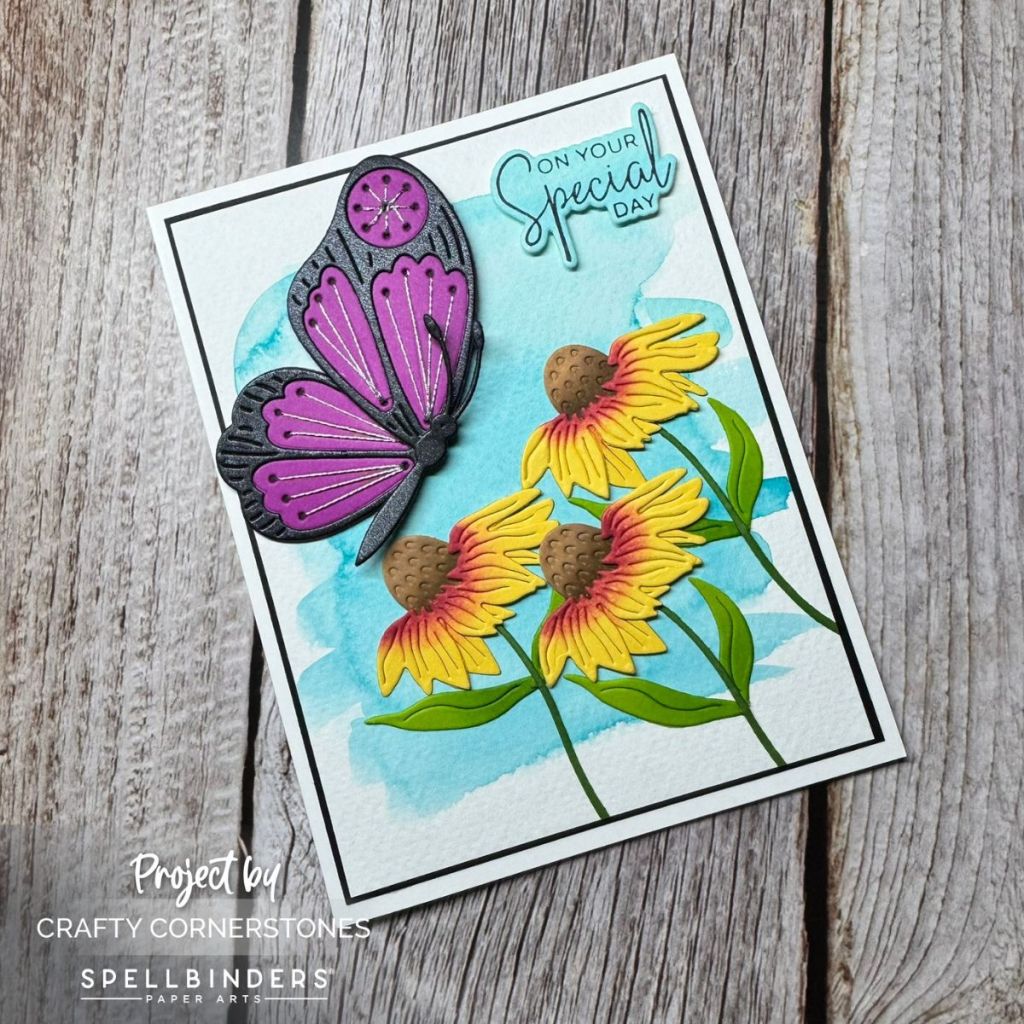
Creating a Sunny Stitched Butterfly Scene with the Spellbinders January 2026 Stitching Die of the Month
It’s Time to Join the Spellbinders Monthly Clubs
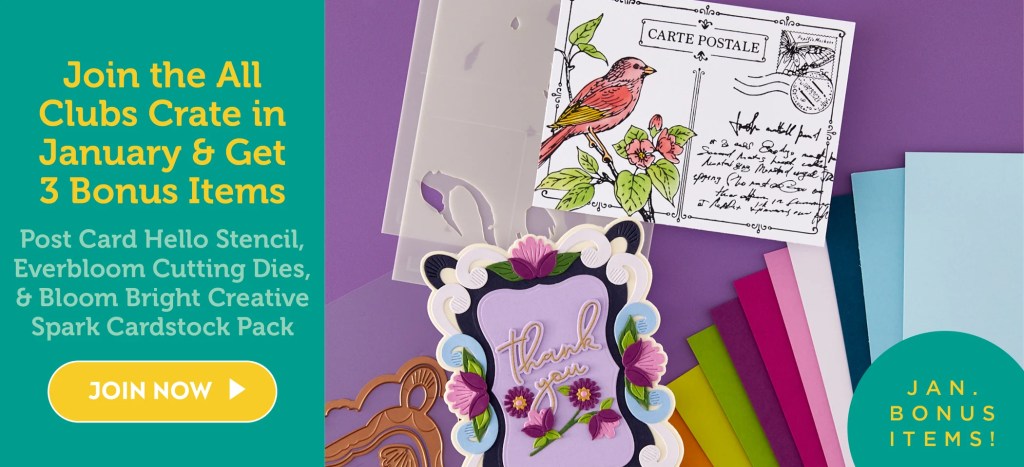
If you’ve been thinking about joining the Spellbinders Monthly Clubs, now is the perfect time. You can subscribe to an individual club that fits your style or choose the All-Clubs Crate, which gives you the entire collection each month at a great value. The All-Clubs Crate includes eight clubs plus exclusive bonuses such as one free shipping coupon per month, Colorwheel Cardstock, and 15% off select Spellbinders products. It’s an incredible value for cardmakers who love variety and coordination.
Butterfly Dance – Stitching Die of the Month January 2026
For today’s project, I am featuring the Stitching Die of the Month for January 2026, Butterfly Dance. This butterfly design is both playful and elegant, making it perfect for a wide range of card styles.
I cut the butterfly pieces from Black Pearl Metallic Cardstock and Mulberry Cardstock. After cutting all the pieces, I decided to create a bright, sunny scene to really let the butterfly shine.
Stitching the Butterfly
When working with stitched dies, I like to give myself a little extra time to ensure everything is secure. I started by stitching the butterfly using DMC Silver Metallic Thread D415. The silver adds a subtle shimmer, but this design would look beautiful stitched in almost any color. Butterflies naturally showcase a wide range of hues, so this die is very versatile.
Once the stitching was complete, I adhered the top and base layers of the butterfly to help seal the stitching in place and set it aside to dry.
Creating a Watercolor Background
While the butterfly was drying, I worked on the background. I wanted a soft, sunny sky effect, so I opted for a watercolor technique.
I misted my watercolor palette with a spray bottle, then used a cup of water and a wet round brush to stroke blue watercolor across my background panel. Once I was happy with the look, I set the panel aside to dry completely.
Building the Floral Details
For the flowers, I chose cheerful daisies with yellow petals and red centers.
- Petals and centers were die cut from Beeswax Cardstock
- Stems were cut from Fern Cardstock
- Leaves were cut from Rainforest Cardstock
To add color to the centers, I lightly blended Wildberry Ink from Concord & 9th using mini blending brushes. For additional depth, I used Wheat and Nutmeg inks on the floral centers and softly blended Artichoke Ink at the base of the leaves. Once assembled, the flowers were set aside to dry.
Adding the Sentiment with BetterPress
For the sentiment, I used a scrap piece of cardstock where I had tested my watercolor colors. Using the Spellbinders BetterPress System, I pressed a sentiment from the A Little Message Sentiments set and die cut it with the coordinating die.
This is a great way to use up test pieces while adding interest and continuity to the card.
Final Assembly and Card Design
Once all the elements were ready, it was time to assemble the card.
I trimmed the watercolor panel down to 3 ⅞” x 5 ⅜” and arranged all the elements until I was happy with the layout.
- Foam tape was added behind the butterfly for balance and dimension
- Foam tape was also used behind the sentiment for extra depth
- Flowers were adhered directly to the watercolor panel
Any stems extending beyond the panel were trimmed away. To frame the scene, I added a black cardstock panel behind the watercolor panel, then adhered everything to an A2 card base.
Final Thoughts and Inspiration
I hope you enjoyed today’s Butterfly Dance inspiration. Do you subscribe to the Spellbinders Clubs? I’d love to know which ones are your favorites.
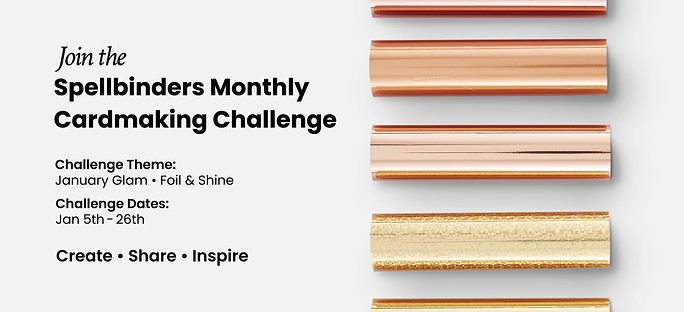
Spellbinders has also launched their very first Monthly Cardmaking Challenge. The January 2026 Challenge is officially live, running from January 7th through January 26th, 2026, with the theme January Glam – Foil and Shine. You can find all the details on the Spellbinders blog.
Looking for even more inspiration? Be sure to check out my ongoing posts featuring the Spellbinders 2026 Advent Calendar. Yes, I am still working through the entire calendar. You can find Day One on the blog.
Supply List
- Spellbinders Stitching Die of the Month January 2026: Butterfly Dance
- Spellbinders BetterPress System
- A Little Message Sentiments Press Plate & Die
- DMC Silver Metallic Thread D415
- Spellbinders Black Pearl Metallic Cardstock
- Spellbinders Mulberry Cardstock
- Spellbinders Beeswax Cardstock
- Spellbinders Fern Cardstock
- Spellbinders Rainforest Cardstock
- Concord & 9th Wildberry Ink
- Concord & 9th Wheat Ink
- Concord & 9th Nutmeg Ink
- Concord & 9th Artichoke Ink
- Mini Blending Brushes
- Watercolor Paints
- Watercolor Paper
- Foam Tape


Leave a comment