Pink and Main Day 13 Advent Surprise: Creative Shaker Pockets with a Twist
Today’s Pink and Main Advent Calendar surprise for Day 13 was Shaker Pockets, and once again it was a super useful and versatile addition. These pockets are perfect for cards, tags, gift toppers, and so much more.
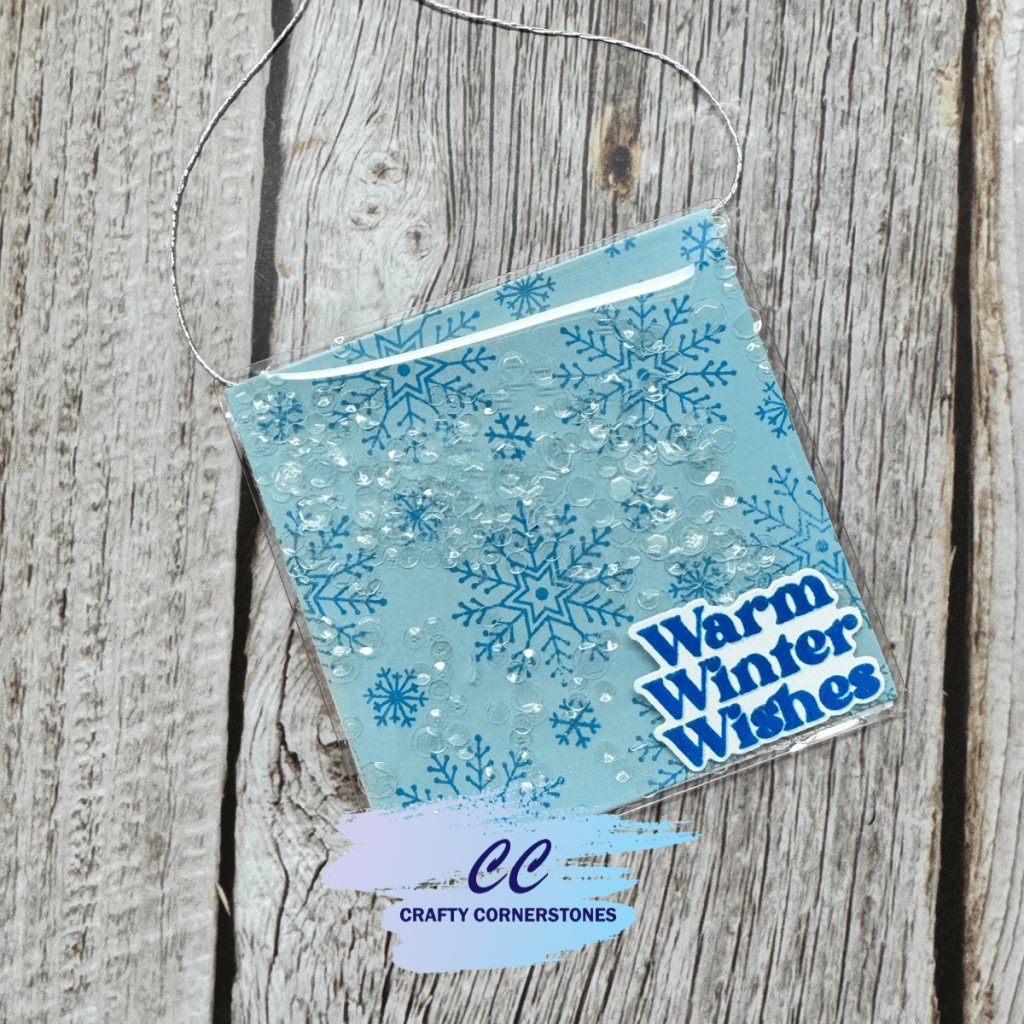
For today’s project, I decided to take my shaker pocket in a slightly non-traditional direction and turn it into a full shaker tag using the shaker covers themselves. This simple idea creates a fun interactive element that would be perfect for gifts.
Creating a Tone-on-Tone Shaker Background
I started by stamping light blue cardstock with Blue Raspberry ink using a snowflake stamp from the Snowflake Sayings stamp set. This gave me a soft tone-on-tone background that adds interest without overpowering the shaker elements.
Once the stamping was complete, I used the 3-inch square dies from Day 3 to cut the stamped panel into a perfect square for the inside of the shaker pocket.
Assembling the Shaker Pocket Tag
Next, I removed the protective cover from the shaker pocket and placed my stamped tone-on-tone panel inside. I sealed the pocket on three sides, leaving one side open to add the shaker elements.
I filled the pocket with clear shaker sequins, keeping the look clean and frosty to match the winter theme.
Before sealing the final edge, I added my tag string by securing it under the last flap of the shaker pocket. Since the entire tag is a shaker, there wasn’t anywhere to punch a hole afterward, so this step was important to plan ahead.
Finishing the Back of the Tag
Once the shaker pocket was fully sealed, I cut a second 3-inch square from white cardstock. I stamped a few additional snowflakes in the corner using the same ink and stamp set as before.
This panel was adhered to the back of the shaker tag to hide all the shaker pocket flaps and give the tag a clean, finished look.
Heat Embossed Sentiment for a Polished Finish
For the front of the tag, I stamped the sentiment “Warm Winter Wishes” from the Snowflake Sayings stamp set using Blue Raspberry ink. I then stamped over it again with clear embossing ink and applied clear embossing powder.
Using a pre-warmed heat tool, I melted the embossing powder. This technique is one of my favorites—using colored ink with clear embossing powder is a great way to perfectly match your project when you don’t have a coordinating embossing powder.
I used the Snowflake Sayings matching dies to cut out the sentiment and secured it to the bottom corner of the shaker tag with double-sided adhesive tape. Liquid adhesive works well too, but it takes much longer to dry on acetate shaker covers.
Final Thoughts on Shaker Tags
This shaker tag came together quickly and easily, but it is so much fun and makes any gift feel extra special. Shaker pockets are incredibly versatile, and this project shows just one way to stretch their use beyond cards.
Do you make handmade tags for your gifts? Have you ever tried creating a shaker tag?
Birthday Bash Event
Are you enjoying the Pink and Main Advent Calendar as much as I am? Have you thought about signing up for the upcoming Pink and Main Birthday Bash? It is going to be EPIC! I mean just look at that instructor line up in the graphic below!
DO NOT WAIT SIGN UP TODAY


EVENT KITS WILL NOT SHIP UNTIL CLOSER TO THE EVENT – PLEASE DO NOT ADD OTHER ITEMS TO YOUR PURCHASE!
REMINDER! If you’re signing up for the Birthday Bash Virtual Event, the kit will not ship for a few months! If you add anything else to your order, it will be delayed until the kits ship!
Missed a 2025 Advent Project? Links Below
Spellbinders 2025 Advent
- Spellbinders Advent Day 1
- Spellbinders Advent Day 2
- Spellbinders Advent Day 3
- Spellbinders Advent Day 4
- Spellbinders Advent Day 5
- Spellbinders Advent Day 6
- Spellbinders Advent Day 7
- Spellbinders Advent Day 8
- Spellbinders Advent Day 9
- Spellbinders Advent Day 10
- Spellbinders Advent Day 11
- Spellbinders Advent Day 12
- Spellbinders Advent Day 13
Pink and Main 2025 Advent
- Pink and Main Day 1
- Pink and Main Day 2
- Pink and Main Day 4
- Pink and Main Day 5
- Pink and Main Day 6
- Pink and Main Day 7
- Pink and Main Day 8
- Pink and Main Day 9
- Pink and Main Day 10
- Pink and Main Day 11
- Pink and Main Day 12
Thank you so much for stopping by Crafty Cornerstones. Be sure to subscribe so you don’t miss future projects. Using my affiliate links is never an extra cost to you and helps me continue sharing crafty inspiration. I’d also love to hear from you—leave a comment below and let me know what you’re creating.
Supply List
- Pink and Main Shaker Pockets (Day 13) (Sold Out)
- Pink and Main Snowflake Sayings Stamp Set (Discontinued)
- Alternate – Winter Spotlight Sayings
- Pink and Main Snowflake Sayings Coordinating Dies (Discontinued)
- Alternate – Winter Spotlight Sayings Dies
- Pink and Main 3” Square Dies (Day 3) (Sold Out)
- Blue Raspberry Ink
- Clear Embossing Ink
- Clear Embossing Powder
- Light Blue Cardstock
- White Cardstock
- Clear Shaker Sequins
- Alternate – Diamond Confetti Sequins
- EZ Tear 1/8″ Double-Sided Adhesive Tape
- Heat Tool
- Tag String


Leave a comment