Using the Spellbinders Day 13 Strip Embossing Folder to Add Texture and Dimension
One of my favorite things about the Spellbinders Advent Calendar is discovering tools that encourage you to look at card design a little differently. For Day 13, we received a strip embossing folder, and this is one of those products that may seem simple at first glance but opens the door to so many creative possibilities.
Strip embossing folders are especially fun because they allow you to emboss smaller sections of cardstock—perfect for accents, grounding panels, and layered designs where a full-size embossing folder just would not work.
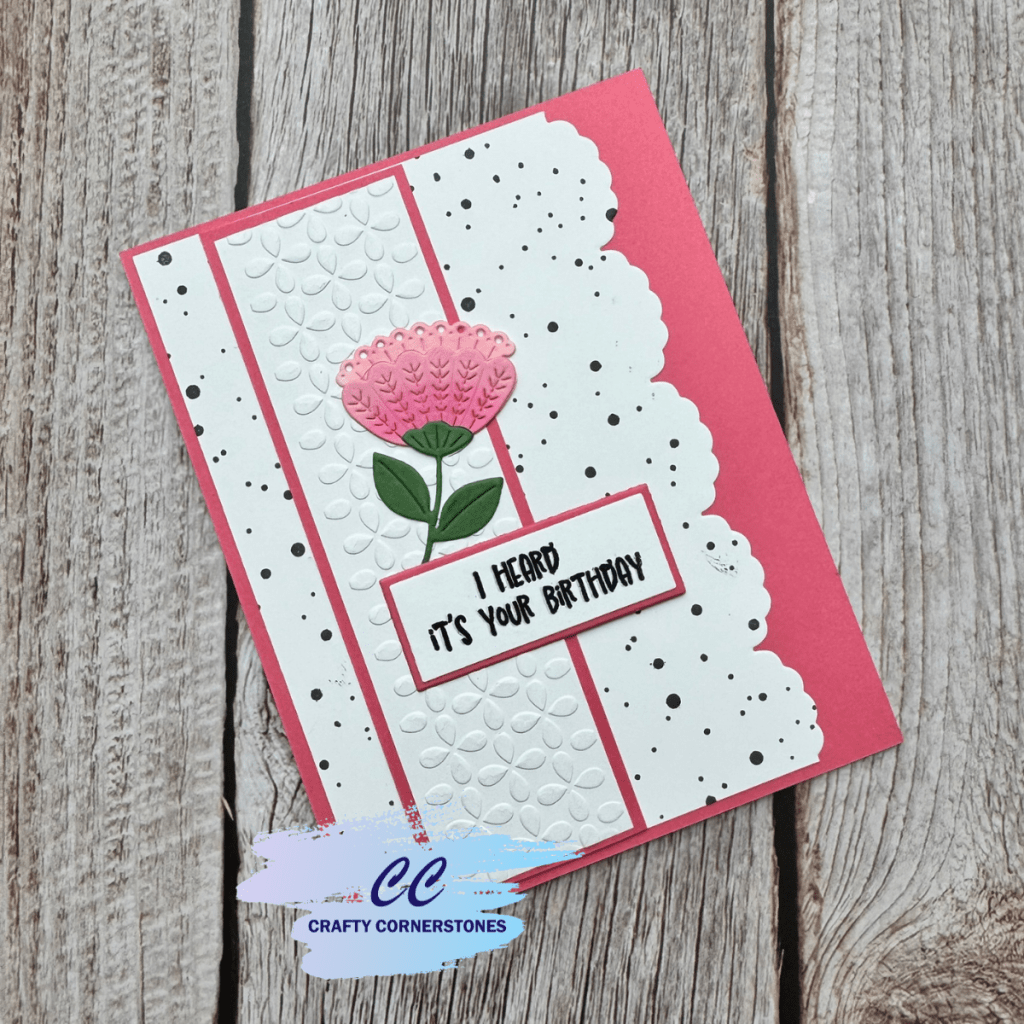
For today’s project, I used the embossing folder to create a dimensional grounding panel for a floral birthday card.
Creating the Embossed Grounding Panel
I began by embossing a strip of white cardstock using the Day 13 embossing folder. Once the strip was embossed, the pattern immediately reminded me of flowers, which helped guide the rest of the card design.
I set the embossed panel aside and pulled out the floral die from Spellbinders Day 5. I cut two flowers using Tutu and Bellini cardstock and cut the stems from Fern cardstock.
To add dimension and contrast, I used a dirty pink blending brush from my stash with leftover ink, concentrating the color at the base of each flower. This subtle shading really helps the die cuts come to life. Once the flowers were assembled, I set them aside to focus on the card base.
Layering the Embossed Strip
Knowing I wanted the embossed strip to act as a long grounding panel, I trimmed it down to 5 ⅛ inches long by 1 ⅜ inches wide. I then layered it onto a slightly larger piece of Dahlia cardstock, allowing a small border to show on all sides. This extra layer adds definition and helps the embossing stand out even more.
Adding Texture with Ink Splatters and a Border Die
Rather than using a plain white background panel, I decided to add visual interest with black splatters. Using a splatter stamp and black ink, I stamped splatters across a white panel trimmed to 4 inches by 5.25 inches.
Even with the splatters, the panel still felt like it needed something extra. As I looked through my stash, I came across the Eyelet Scallop Border die. I didn’t want the frilly edge, so I used just the edge die to create a clipped border along one side of the panel.
Once finished, I adhered this panel to a piece of Dahlia cardstock trimmed to A2 size, leaving a ¼-inch border on the left and a much wider decorative border on the right.
Final Assembly and Sentiment
After adhering all the layers, I played with the layout and decided to place the layered embossed strip opposite the scalloped edge, leaving some of the splattered background visible on both sides.
For the sentiment, (Stamp set from Day 11) I stamped it onto white cardstock using black ink, then stamped again with embossing ink and heat embossed it using clear embossing powder. The sentiment was die cut using Precision Layering Die Set A, with a coordinating backing panel cut from Dahlia cardstock using Precision Layering Die Set B.
In the end, I chose to use just one of the two flowers I made. I positioned it slightly off the edge of the embossed panel and layered the sentiment over the base of the stem.
Final Thoughts
I am really happy with how this card turned out. I do not often reach for my border dies, but this project was a good reminder of how impactful they can be when used thoughtfully.
Do you have border dies in your stash that you forget to use? This might be the perfect excuse to pull them out and experiment a little.
Missed a 2025 Advent Project? Links Below
Spellbinders 2025 Advent
- Spellbinders Advent Day 1
- Spellbinders Advent Day 2
- Spellbinders Advent Day 3
- Spellbinders Advent Day 4
- Spellbinders Advent Day 5
- Spellbinders Advent Day 6
- Spellbinders Advent Day 7
- Spellbinders Advent Day 8
- Spellbinders Advent Day 9
- Spellbinders Advent Day 10
- Spellbinders Advent Day 11
- Spellbinders Advent Day 12
Pink and Main 2025 Advent
- Pink and Main Day 1
- Pink and Main Day 2
- Pink and Main Day 4
- Pink and Main Day 5
- Pink and Main Day 6
- Pink and Main Day 7
- Pink and Main Day 8
- Pink and Main Day 9
- Pink and Main Day 10
- Pink and Main Day 11
- Pink and Main Day 12
Thank you so much for stopping by Crafty Cornerstones. Be sure to subscribe so you don’t miss future projects. Using my affiliate links is never an extra cost to you and helps me continue sharing crafty inspiration. I’d also love to hear from you—leave a comment below and let me know what you’re creating.
Supply List
- Spellbinders Advent Calendar 2025 – Day 13 Strip Embossing Folder
- Spellbinders Advent Calendar 2025 – Day 5 Floral Die
- Spellbinders Advent Calendar 2025- Day 11 Stamp Set
- Spellbinders Eyelet Scallop Border Die (on Clearance)
- Alternate – Winter Boarders
- Alternate – Stitch and Dots Scallop Boarders
- Spellbinders Precision Layering Die Set A
- Spellbinders Precision Layering Die Set B
- Spellbinders Cardstock: Tutu, Bellini, Fern, Dahlia
- White Cardstock
- Black Ink
- Embossing Ink
- Clear Embossing Powder
- Splatter Stamp
- Blending Brush
- Die Cutting Machine
- Heat Tool
- Stamping Platform
- Stamp block
- Adhesives


Leave a comment