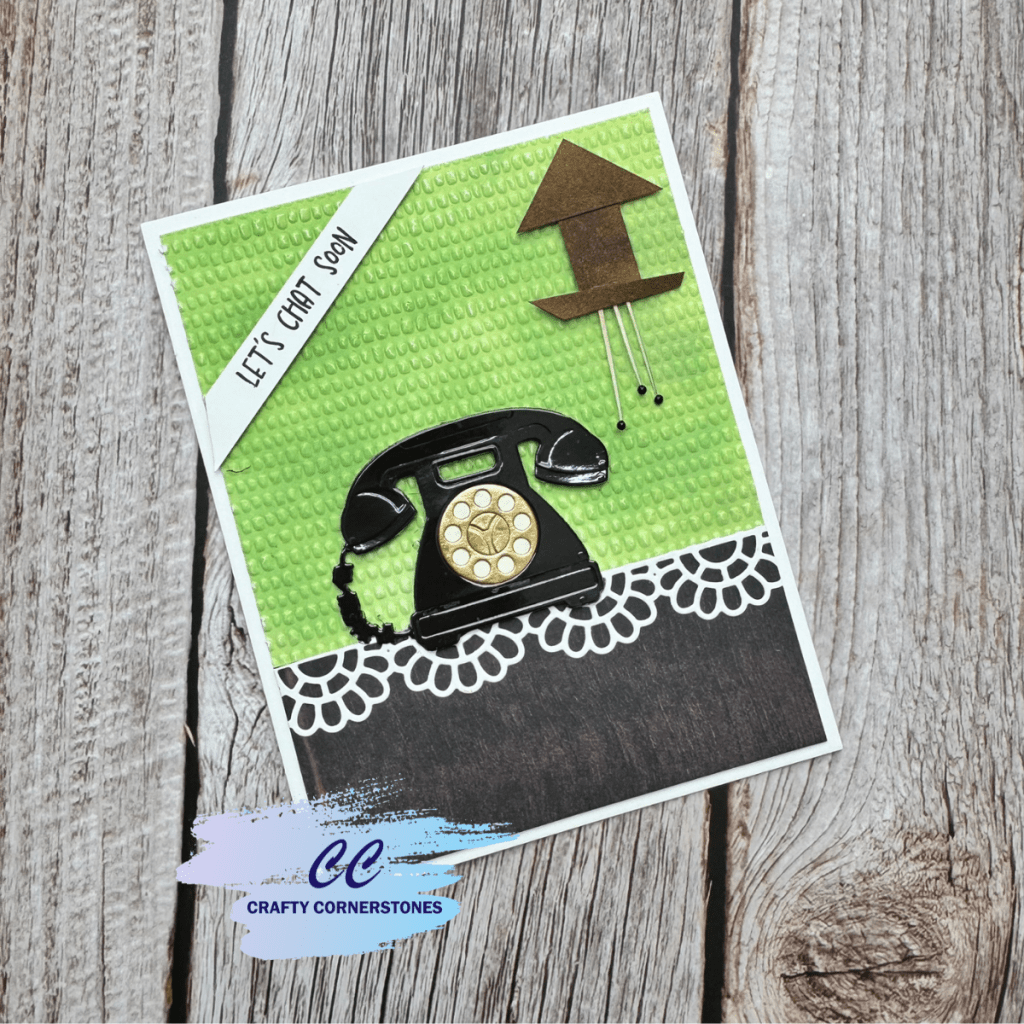
Spellbinders Day 12, 2025 Advent: A nostalgic card inspired by vintage rotary phones and grandma’s house decor
It is hard to believe I can say that my parents still have and use these. Can you guess what it is?
Yep, today’s surprise from the Spellbinders Advent Calendar was a retro phone. You know the kind—the ones where you had to spin the dial and wait for each number to rotate back before dialing the next one. My parents still have one in their home. While it is seldom used now, it is still fully functional.
Retro phones came in so many colors. I feel like the top choices in the 1970s were olive green, off white, yellow, and classic black. In later years, more playful colors appeared like teal blue and red. For today’s card, I chose black and created a scene inspired by what you might expect to find in your grandma’s house.
This design was incredibly fun to put together, complete with a lace doily and a coo-coo clock.
Creating the Retro Phone Focal Point
Since the phone is the star of the show, that is where I started.
I used Mirror Metallic cardstock from the Onyx Assorted Treasured Cardstock pack to cut the main body of the phone and the phone cord. Yes, phones had cords back then, and as a teen, the longer the cord, the better. That way you could stretch it around the corner for a little privacy.
For the dial and the center of the dial, I used Brushed Gold cardstock. The layer behind the dial was cut from Alabaster cardstock. While layering everything together, I felt the very center of the phone needed a little extra detail. I used the embossing folder from Day 6 to emboss the small center circle before adhering it to the phone.
Once the phone was assembled, I set it aside and moved on to the background.
Designing a 1970s Inspired Background
I really wanted to bring in that classic 70s green. I achieved the perfect shade using Shabby Shutters Distress Oxide ink. I ink blended a panel and then ran it through the Dimpled Embossing Folder to add texture. This instantly felt like vintage wallpaper.
The wallpaper panel was trimmed to 4 inches by 5.25 inches.
Building the Table and Doily Detail
For the table, I found a scrap piece of patterned paper with a woodgrain look. This was cut to 1 3/4 inches tall by 4 inches wide.
To create the doily detail on top of the table, I used the Eyelet Scalloped Border Die. The scalloped piece was adhered to the top edge of the woodgrain panel, and the excess was trimmed from the sides so it aligned perfectly with the 4-inch width. The table and wallpaper panels were then adhered together.
Once the phone was placed on the table, I realized the scene still needed something.
Adding a Handmade Coo-Coo Clock
I immediately thought of the coo-coo clock that hung in my grandma’s house.
Since I did not have a coo-coo clock die, I created my own by cutting various shapes from Acorn cardstock. The Acorn cardstock ended up being a little too light, so I blended Warm Cocoa ink from Gina K Designs over the pieces to deepen the color.
To create the chains hanging from the clock, I shaved three extremely thin strips from Alabaster cardstock. For the weights at the bottom, I used the smallest flat-back pearls I could find and adhered them to the ends of the strips. Once everything was assembled, the clock was set aside to dry.
Sentiment and Final Assembly
While the clock was drying, I stamped my sentiment from the Day 11 stamp set onto white cardstock using black ink.
For the final layout, I centered the phone on the table and placed the coo-coo clock and sentiment in opposite corners. The sentiment was adhered at an angle and trimmed to align with the wallpaper panel. The clock was attached with thin foam tape for dimension, and the phone was also popped up using thin foam tape.
A Truly Nostalgic Scene
This scene brought back so many childhood memories of both my parents’ and grandparents’ homes. It felt very nostalgic as I was putting it together.
Tell me, did you or do you still have one of these old-fashioned phones? And what color was yours?
Missed a 2025 Advent Project? Links Below
Spellbinders 2025 Advent
- Spellbinders Advent Day 1
- Spellbinders Advent Day 2
- Spellbinders Advent Day 3
- Spellbinders Advent Day 4
- Spellbinders Advent Day 5
- Spellbinders Advent Day 6
- Spellbinders Advent Day 7
- Spellbinders Advent Day 8
- Spellbinders Advent Day 9
- Spellbinders Advent Day 10
- Spellbinders Advent Day 11
Pink and Main 2025 Advent
- Pink and Main Day 1
- Pink and Main Day 2
- Pink and Main Day 4
- Pink and Main Day 5
- Pink and Main Day 6
- Pink and Main Day 7
- Pink and Main Day 8
- Pink and Main Day 9
- Pink and Main Day 10
- Pink and Main Day 11
Thank you so much for stopping by Crafty Cornerstones. Be sure to subscribe so you don’t miss future projects. Using my affiliate links is never an extra cost to you and helps me continue sharing crafty inspiration. I’d also love to hear from you—leave a comment below and let me know what you’re creating.
Supply List
- Spellbinders Day 12 Advent Die Set – Retro Phone (SOLD OUT)
- Alternate – Larger size but same concept – C9 Just Calling Die
- Spellbinders Day 11 Sentiment Stamp Set (SOLD OUT)
- Alternate – C9 Just Calling Stamp Set
- Spellbinders Day 6 Embossing Folder (SOLD OUT)
- Alternates – Any embossing folder
- Spellbinders Dimpled Embossing Folder
- Spellbinders Eyelet Scalloped Border Die
- Spellbinders Onyx Assorted Treasured Cardstock (Mirror Metallic)
- Spellbinders Brushed Gold Cardstock
- Spellbinders Alabaster Cardstock
- White Cardstock
- Acorn Cardstock
- Woodgrain Patterned Paper
- Shabby Shutters Distress Oxide Ink
- Gina K Designs Warm Cocoa Ink
- Black Ink
- Flat Back Pearls
- Thin Foam Tape
- Adhesives
- Die Cutting Machine


Leave a comment